How to Use DDNS to Achieve External Network Access to NAS?
When your network has a public IP (IPv4/IPv6), the TeraMaster system provides DDNS (Dynamic Domain Name System) support. You can use this method to bind your DDNS domain name to your public IP address, thereby enabling access to your NAS device via a domain name without needing to remember a complex IP address.
What is DDNS?
DDNS (Dynamic Domain Name System) allows a registered domain name (e.g., example.dyndns.org) to be dynamically mapped to your public IP address, whether it's IPv4 or IPv6. This way, you can access your TeraMaster NAS via a domain name (e.g., mynas.zxc) without having to check your public IP address each time. For example, if your public IPv4 address is 119.119.119.248, you can access your NAS via the domain name mynas.zxc instead of using the IP address directly.
How to Confirm if Your Network Has a Public IP?
Before using DDNS, you first need to confirm whether your network has a public IP address. You can verify this by following these steps:
- Log in to your router's management interface
- In your browser, enter your router's IP address (e.g., 192.168.1.1 or 192.168.0.1) to access its management interface.
- Look for the IP address under "WAN Port" or "External Interface" and note it down.
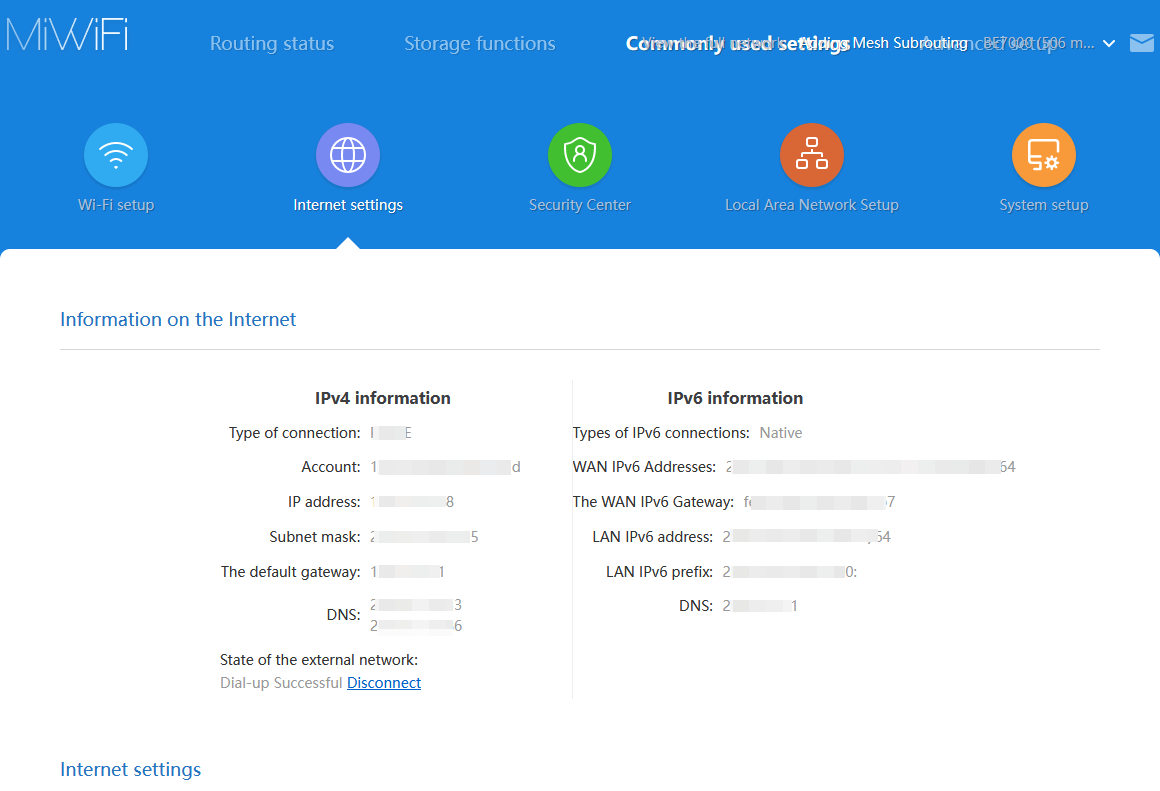
- Confirm if the IP address is a public IP
- Open a browser and visit a website such as ipw.cn to check your external IP address.
- Compare the IP address shown on your router with the external IP address displayed on the website. If they match, it means your broadband is using a public IP address.
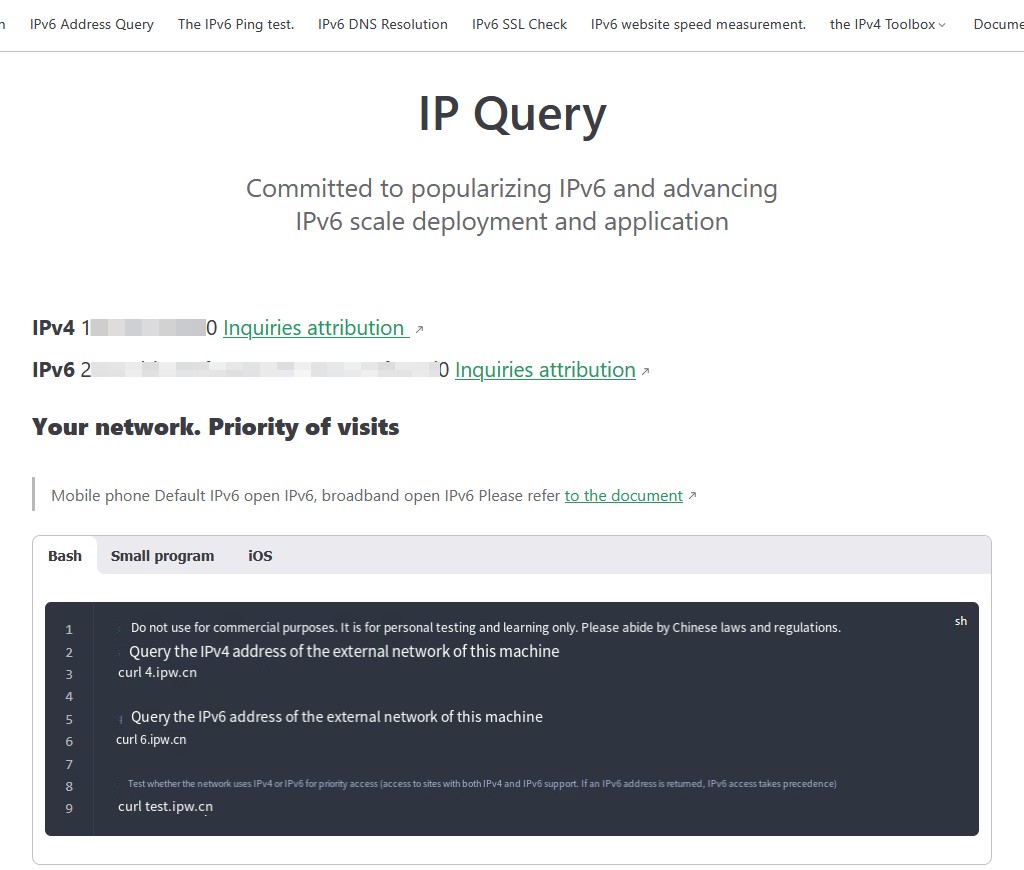
- IPv6 address check
- If you need to confirm whether you have a public IPv6 IP, you can visit a website that supports IPv6, such as ipw.cn.
- If it shows "Your network IPv6 access is prioritized," it indicates your network supports a public IPv6 IP.
What Should You Do If You Don't Have a Public IP?
-
Contact your broadband ISP to apply for a public IP Most residential broadband ISPs assign private IP addresses by default, but some offer public IP addresses as an additional service. You can contact your ISP to inquire if you can apply for a public IP (IPv4 or IPv6). Please note that the ISP may charge an extra fee.
-
Use a DDNS (Dynamic DNS) service If your broadband uses a dynamic public IP, you can use a DDNS service to enable access to your device via a domain name. DDNS will automatically update the DNS record when your public IP address changes, ensuring you can always access the NAS via the domain name.
Common DDNS service providers include:
- Alibaba Cloud
- Tencent Cloud
- DuckDNS
- noip.com
- Cloudflare
- Huawei Cloud DDNS You can configure the DDNS service in the TeraMaster system's Control Panel under "Remote Access" > "DDNS".
- Purchase a static public IP If you need a stable, unchanging public IP, you can contact your ISP to apply for purchasing a static public IP. A static public IP provides a permanent public access address for your device and usually requires an additional fee. This solution is suitable for applications requiring long-term stable connections (such as web servers, remote work, etc.).
How to Purchase a DDNS Domain Name?
To use a DDNS service, you need to purchase and configure a DDNS domain name. The steps for purchasing and setting up a DDNS domain name are as follows:
-
Choose a DDNS service provider Select a service provider that supports DDNS (e.g., No-IP, DuckDNS, Alibaba Cloud, Tencent Cloud, PeanutHull (Oray), Cloudflare, Huawei Cloud DDNS, etc.).
-
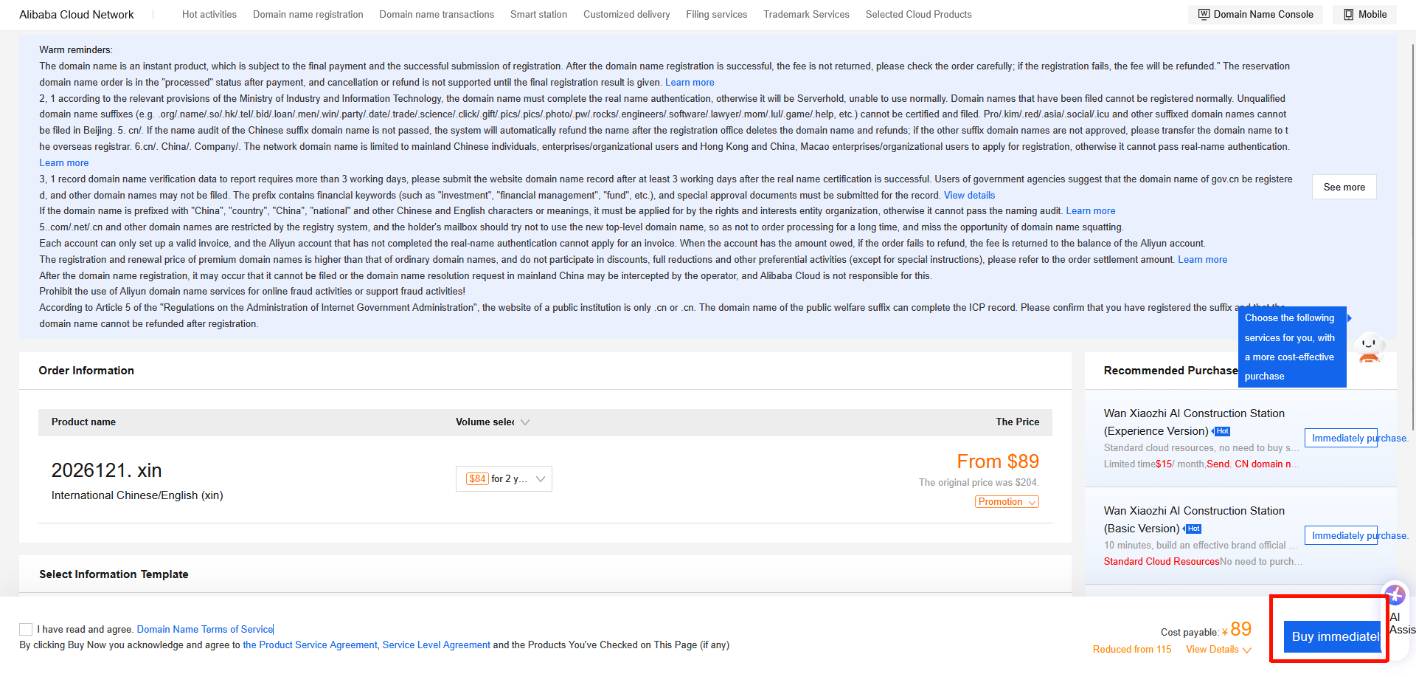
Register and purchase a domain name Using Alibaba Cloud as an example to demonstrate the process of purchasing a domain name and obtaining an AccessKey. If you choose another domain name provider, please refer to its relevant help documentation.
- Open Alibaba Cloud Wanwang, enter the domain name you wish to purchase, check its availability, fill in the required information, and complete real-name verification.
- Click "Purchase Now" and complete the payment process.
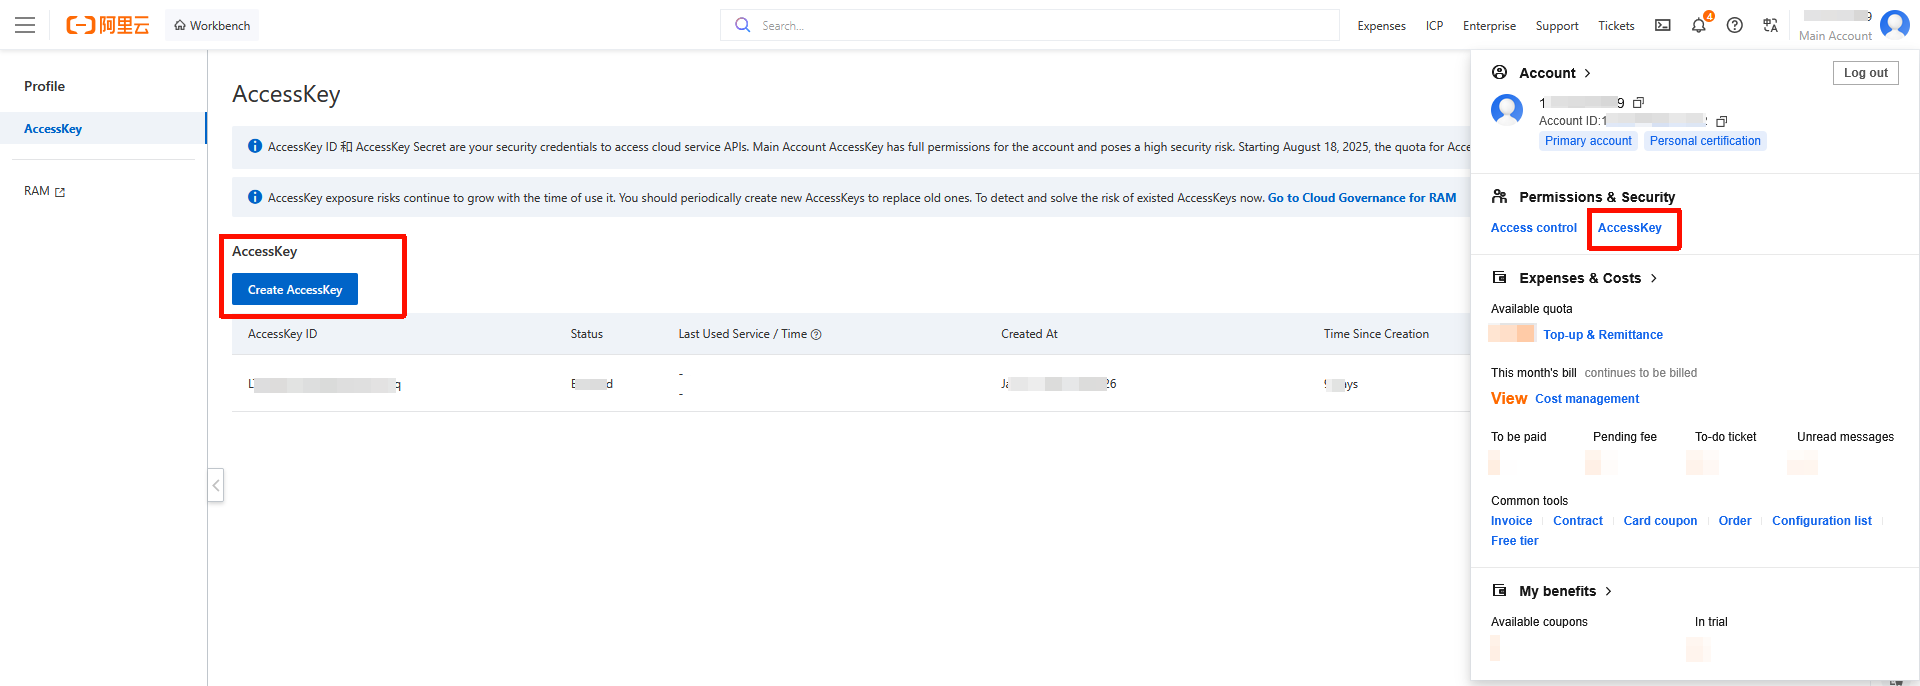
- Click the main account icon in the upper right corner of the page to access the "AccessKey" management page. Create a new "AccessKey" and securely save the "AccessKey ID" and "AccessKey Secret". This information will be used later when configuring DDNS.
How to Configure DDNS in TeraMaster NAS?
- Log in to your NAS, open the "Control Panel", click "Remote Access" > "DDNS".
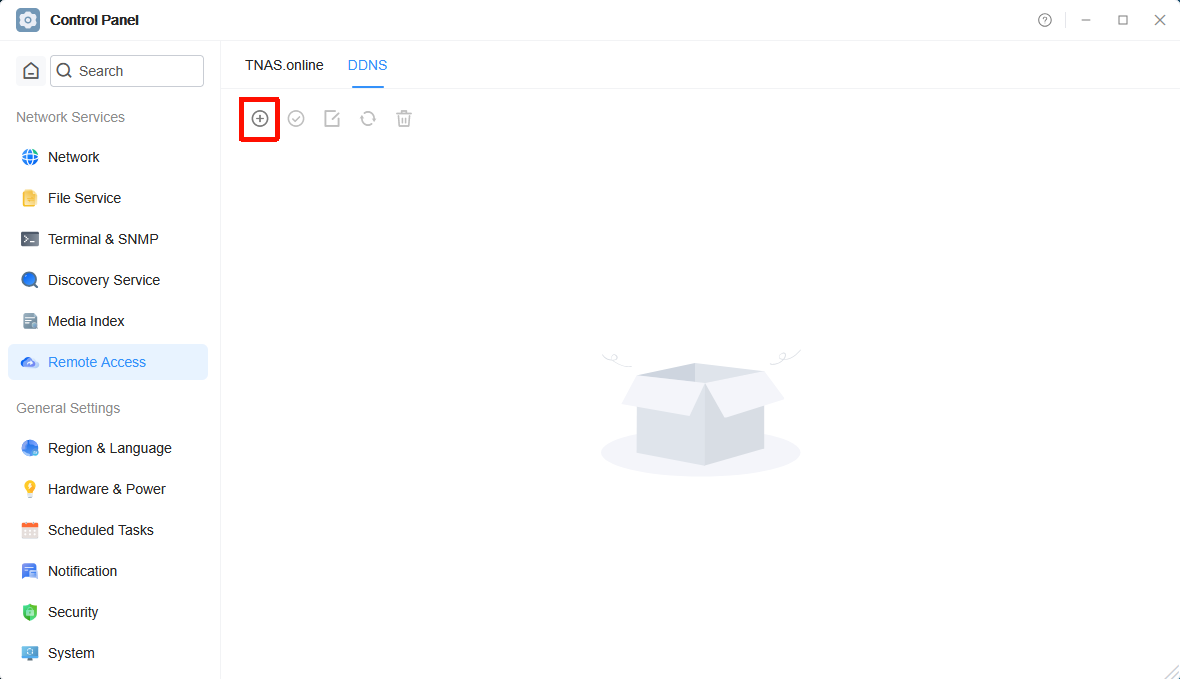
- Click the "Create" icon, select the DDNS service provider you use, and fill in the "Username", "Password", and "Dynamic Domain Name" (Please fill in based on the registration information provided by your DDNS service provider. If you don't have a DDNS service provider account, please register and purchase a domain name first.).
- DDNS Service Provider: Select the DDNS service provider you use (e.g., dyndns, noip.com, DuckDNS, Alibaba Cloud, etc.).
- Username: Enter the username provided by your DDNS service provider.
- Password: Enter the password provided by your DDNS service provider.
- Dynamic Domain Name: Enter the DDNS domain name you purchased (e.g., mynas.zxc).
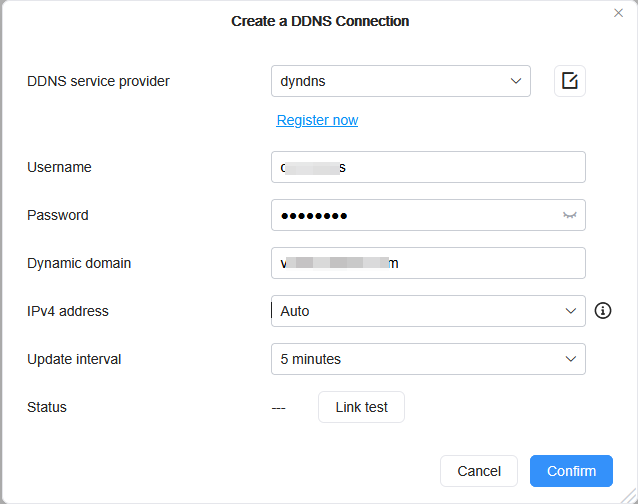
- After filling in the details, click "Connection Test". Once the connection status is confirmed as normal, click "OK" to save the configuration.

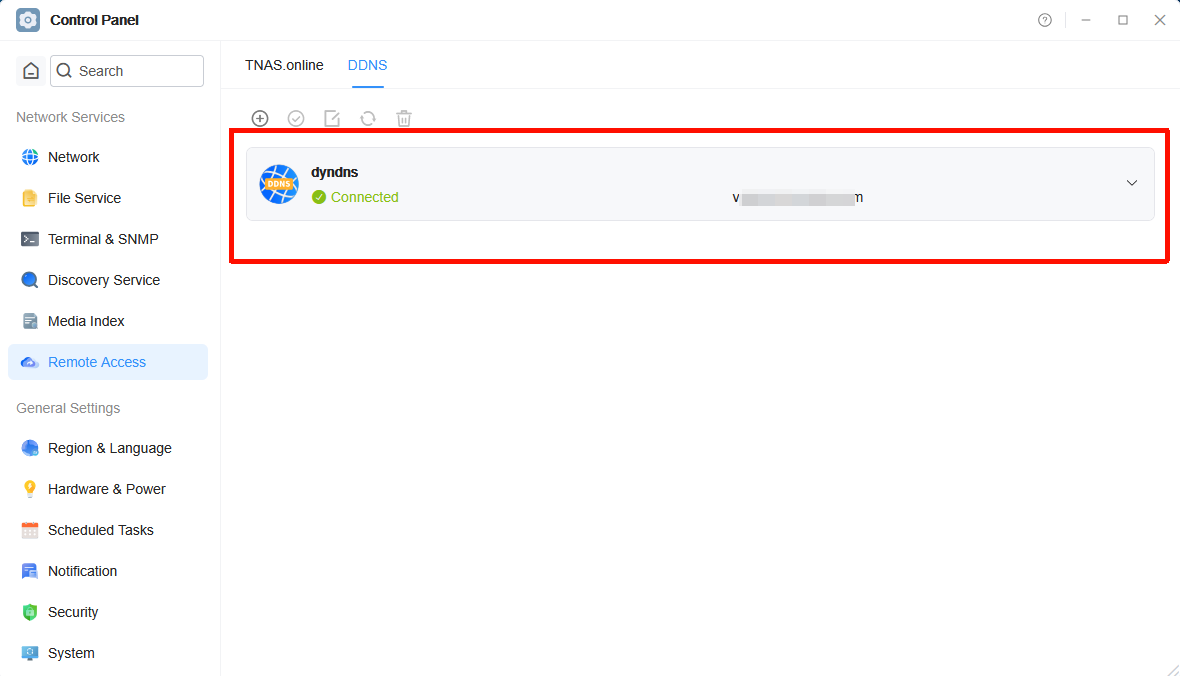
After adding, the NAS system will automatically synchronize your public IP address with your domain name.
Add Port Forwarding Rules
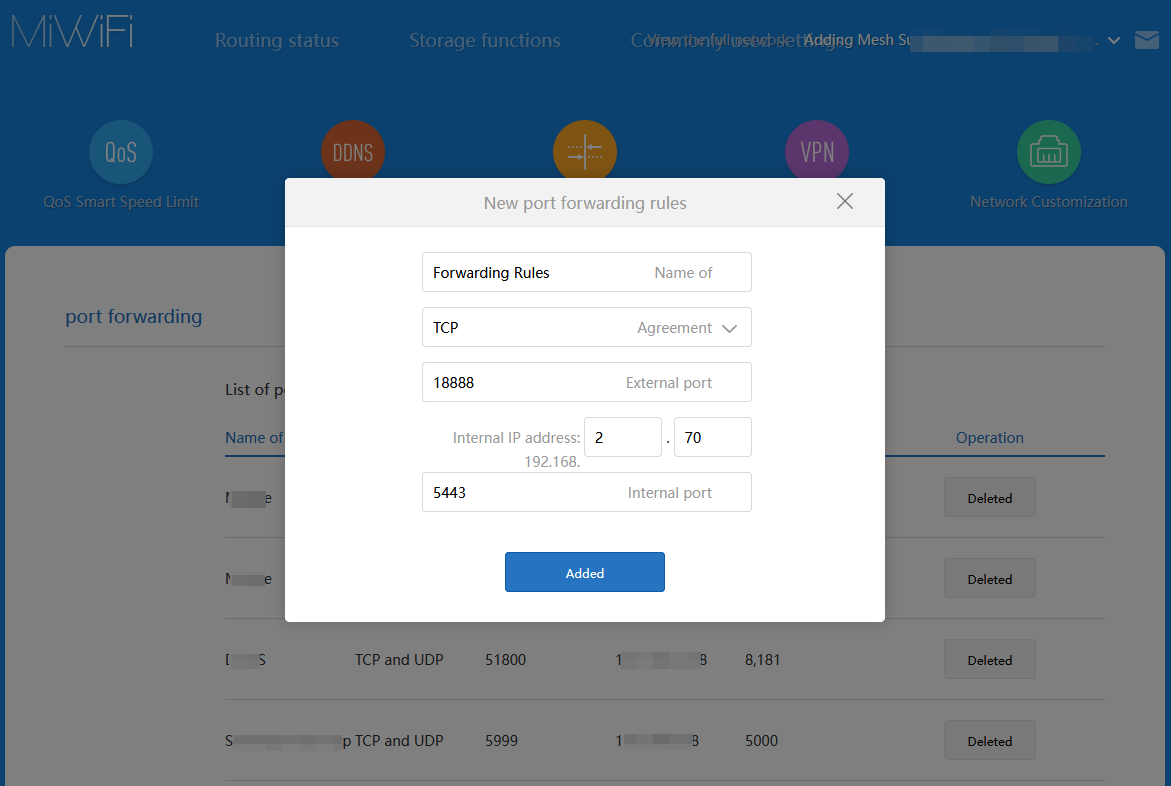
Assuming you want to forward external port 18888 to the internal port 5443 of the NAS, please fill in the relevant information in the rule configuration: Using a Xiaomi router as an example:
- Log in to the router's backend, enter the "Advanced Settings - Port Forwarding" settings, click "Add Rule", and set the following parameters:
- Rule Name: Set an easy-to-remember name for this port mapping (e.g., "NAS Remote Access").
- Protocol: Select the default TCP protocol.
- Internal IP Address: Enter the LAN address of your NAS (e.g., 192.168.2.70).
- Internal Port: The port number actually used by the service running on the NAS.
For example:
- If the NAS login port is 5443, then the internal port should be 5443. This port usually matches the access port set in the NAS system and generally does not need to be changed.
- External Port: The port number used to access the NAS from the external network. You can specify this yourself, but ensure it does not conflict with other forwarding rules. Example: Internal Port: 5443
- External Port: 18888 The working principle is: External access to [External Port 18888] → Router forwards → NAS [Internal Port 5443]
- Check port forwarding settings on other routers Please note that port forwarding settings may vary for different brands of routers. If you are using a router from another brand, please refer to the manufacturer's manual to ensure correct configuration of port forwarding.
- Click "Add" to complete the port forwarding rule. Note: To prevent the NAS device's IP address from changing due to router restarts or other reasons, it is recommended to set up static IP address binding with MAC address in the router.
Set a Static IP Address to Prevent IP Address Changes
To prevent the NAS device's IP address from changing due to router restarts or other reasons, it is recommended to set a fixed IP address bound to the NAS in the router. This ensures that the NAS always uses the same LAN IP address after each router restart, thereby avoiding port mapping failures or remote access issues.
Steps:
- Use a browser to access your router's management backend address.
- Typically, you can find DHCP configuration under the router's "Network Settings" or "LAN Settings".
- In the DHCP settings, locate the "Static IP Address Allocation" or "MAC Address Binding" option.
- Enter the MAC address of your NAS device (which can be found on the NAS management page or on the device itself) and assign a fixed IP address (e.g., 192.168.1.111).
- Save the configuration after confirming it is correct. Note: The setup process may vary slightly for different router brands. Please refer to your router's user manual or consult the router manufacturer's technical support for detailed instructions.
Access Verification
After completing the setup, you can use a browser in an external network environment to access your DDNS domain name in the format (domain name:port number) to verify if you can successfully access the TeraMaster NAS. For example, if your domain name is mynas.zxc and the port is 18888, the access link would be: https://mynas.zxc:18888