Centralized Backup
Centralized Backup is a professional backup tool designed specifically for business users. Through Centralized Backup, IT managers can utilize TNAS as a centralized backup server to initiate backup tasks for storage spaces or operating systems from TNAS, covering employee computers, workstations, servers, and virtual machines. When encountering data anomalies or equipment failures, Centralized Backup can rapidly restore data, effectively reducing business losses.
Requirements and Limitations
-
Supported TOS Versions:
TOS 5.1 (x86) TOS 6.0 (x86) TOS 7.0 (x86) -
Hardware and File System:
RAM: 4 GB or higher
Backup destination: Only shared folders using the BTRFS file system are supported (storage quotas, encryption, and shared folders under HyperLock volumes are not supported)
Overview
This section provides a comprehensive view of all connected target devices, details of backup tasks, and their current statuses within Centralized Backup, enabling full monitoring and management.
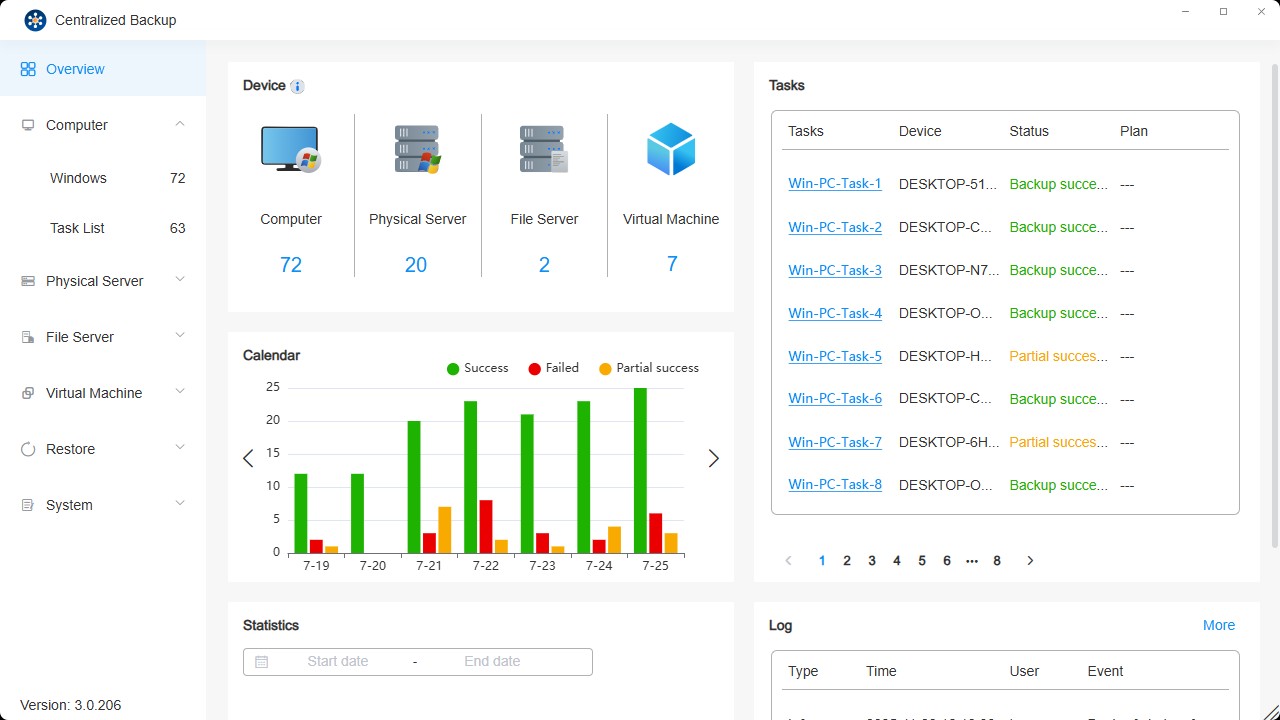
Section Description
- Devices: Shows statistics for all successfully connected devices, regardless of their current online status.
- Tasks: View detailed information and real-time statuses of backup tasks on connected target devices.
- Calendar: Displays statistical information on backup versions over the past seven days.
- Statistics: View backup version statistics within a specified date range.
- Logs: Access recent event logs for the application.
Windows PC / Windows Server
On this page, you can add new Windows PCs/Servers to Centralized Backup, create backup tasks, restore backup data, and manage these devices. Centralized Backup Agent must be installed on the target computer before backups can be executed.
Windows Requirements and Limitations
-
Supported Versions:
Windows PC: Win10, Win11
Windows Server: 2016, 2019, 2022 -
Supported File System:
NTFS -
Supported Backup Types:
Entire device: Backs up the entire computer, including OS, partition information, and data.
System only: Backs up the OS and system partitions (System, EFI, Recovery, MSR).
Custom volumes: Backs up selected volumes and their partition information. -
Network Port:
5510
- Does not support backing up other external devices such as floppy disk drives, USB flash drives, or memory card readers.
- Virtual Hard Disk (VHD) backups are not supported.
- If BitLocker encryption is enabled on your computer, please decrypt it before starting a backup to ensure the device can be properly restored. After restoration, BitLocker encryption will be automatically disabled. To maintain data security, please re-enable BitLocker afterwards.
How to Add a Windows Device
Before creating a backup task, install Centralized Backup Agent on the target device and connect it to TNAS.

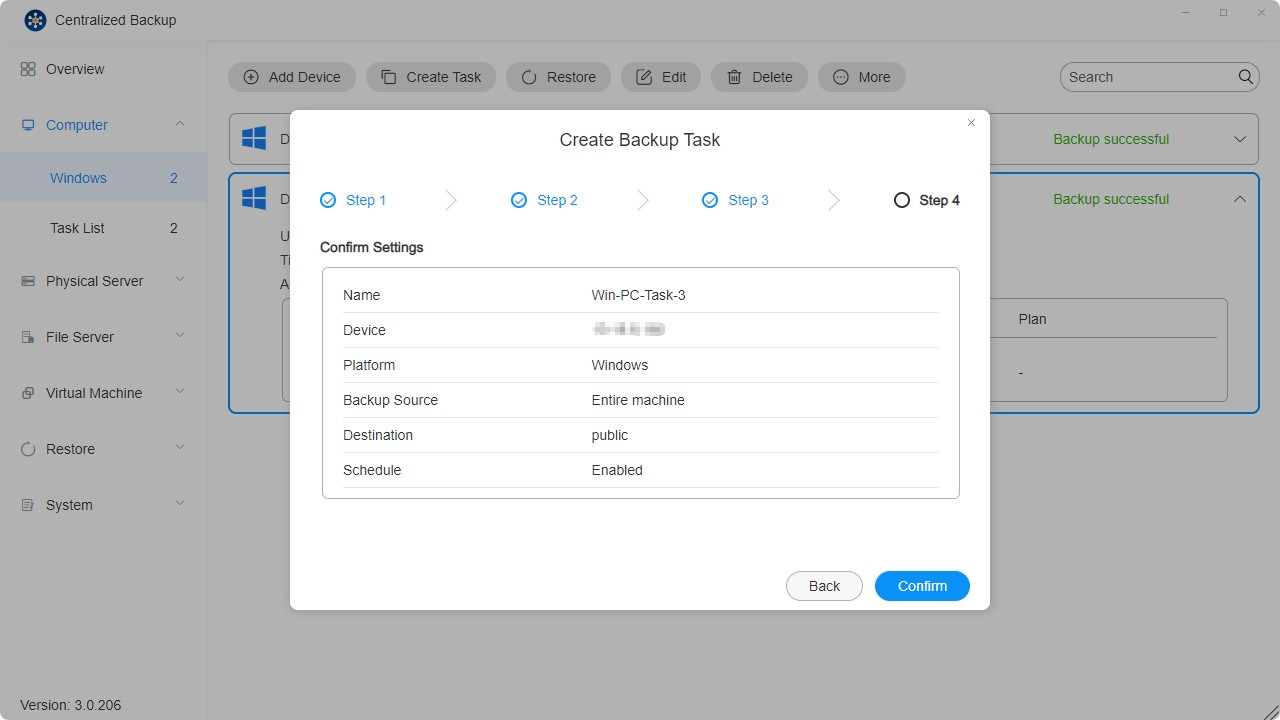
How to Create a Windows Backup Task
- Connect the target device to TNAS.
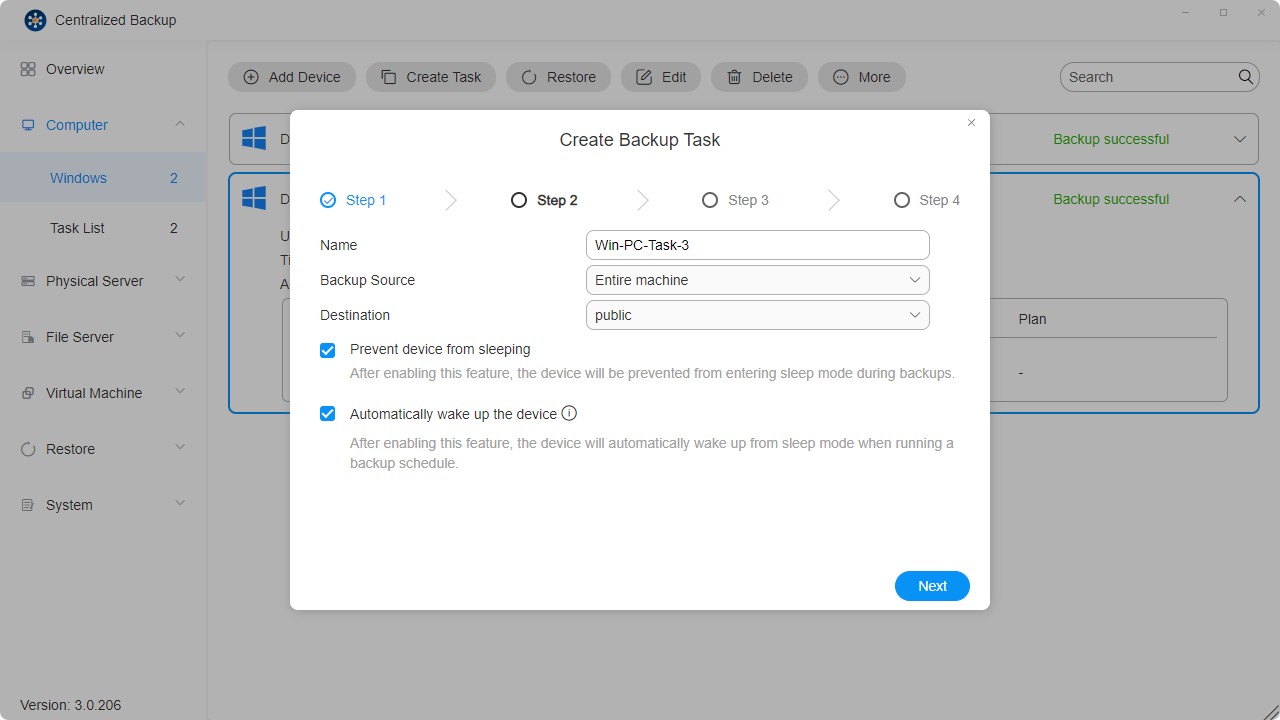
- Click the "Create Task" button.
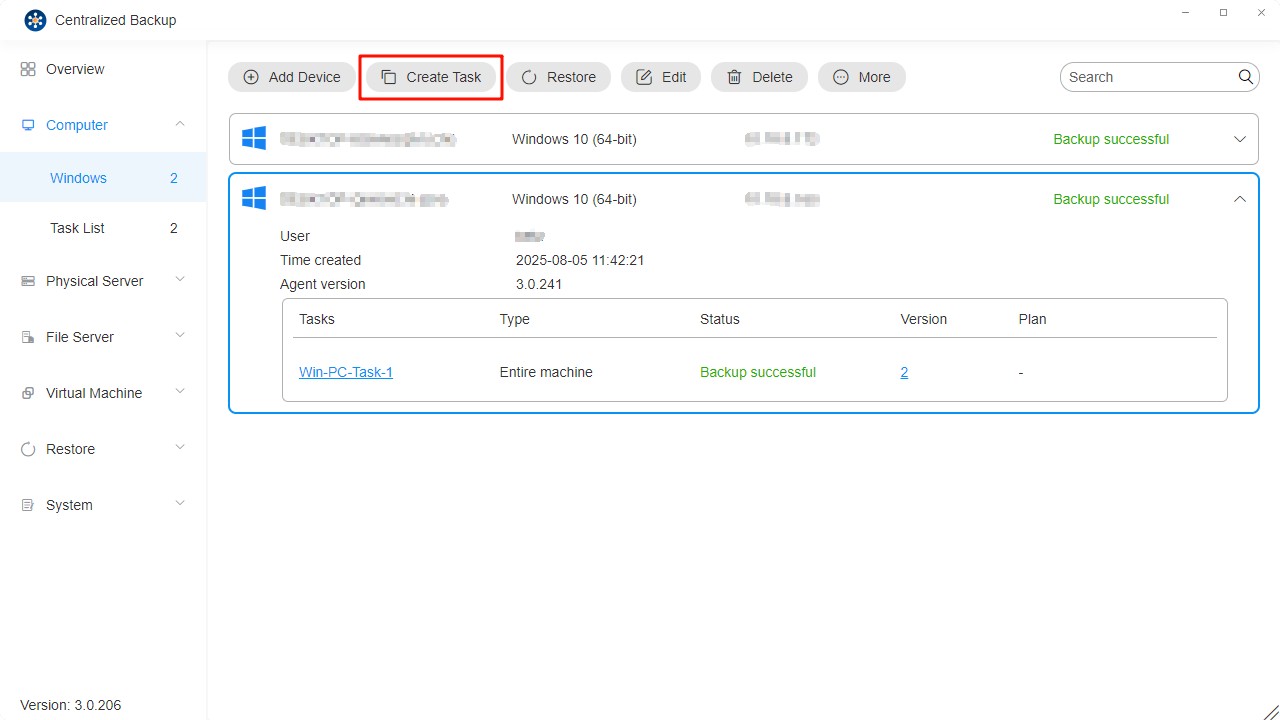
- Configure general task settings—task name, source, destination, and device control settings.
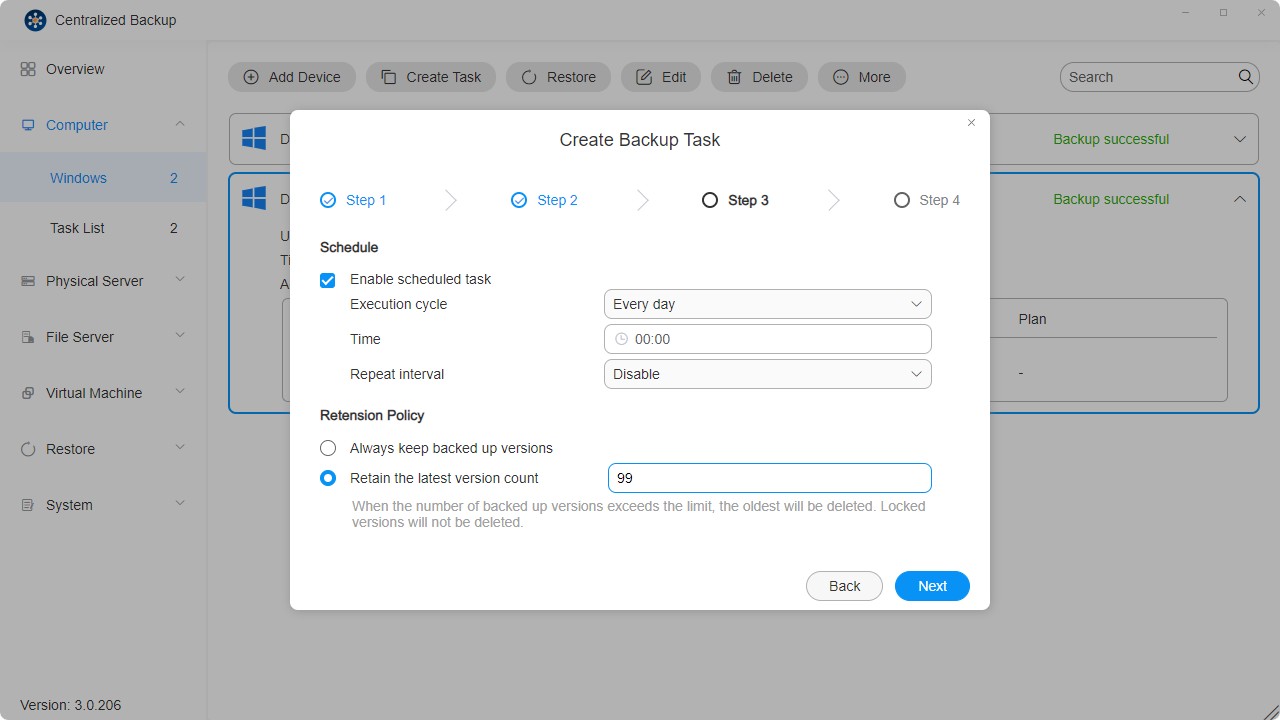
- Set up the task schedule.
- Review the settings and click "Confirm" to complete the task creation.
- Multiple backup tasks can be created for each device.
- Deleting a backup task will also delete its corresponding data from the destination.
- To simplify the backup process, Changed Block Tracking (CBT) is enabled by default. Ensure that Microsoft Volume Shadow Copy Service (VSS) is enabled on each protected device for CBT to function correctly.
- The initial backup for each task is a full backup. Subsequent backups use CBT to perform incremental backups unless VSS is disabled.
- In case of scheduling conflicts, ongoing tasks take priority, and the next cycle begins afterward.
- When a backup version is locked, it is excluded from retention counts and cannot be overwritten or deleted.
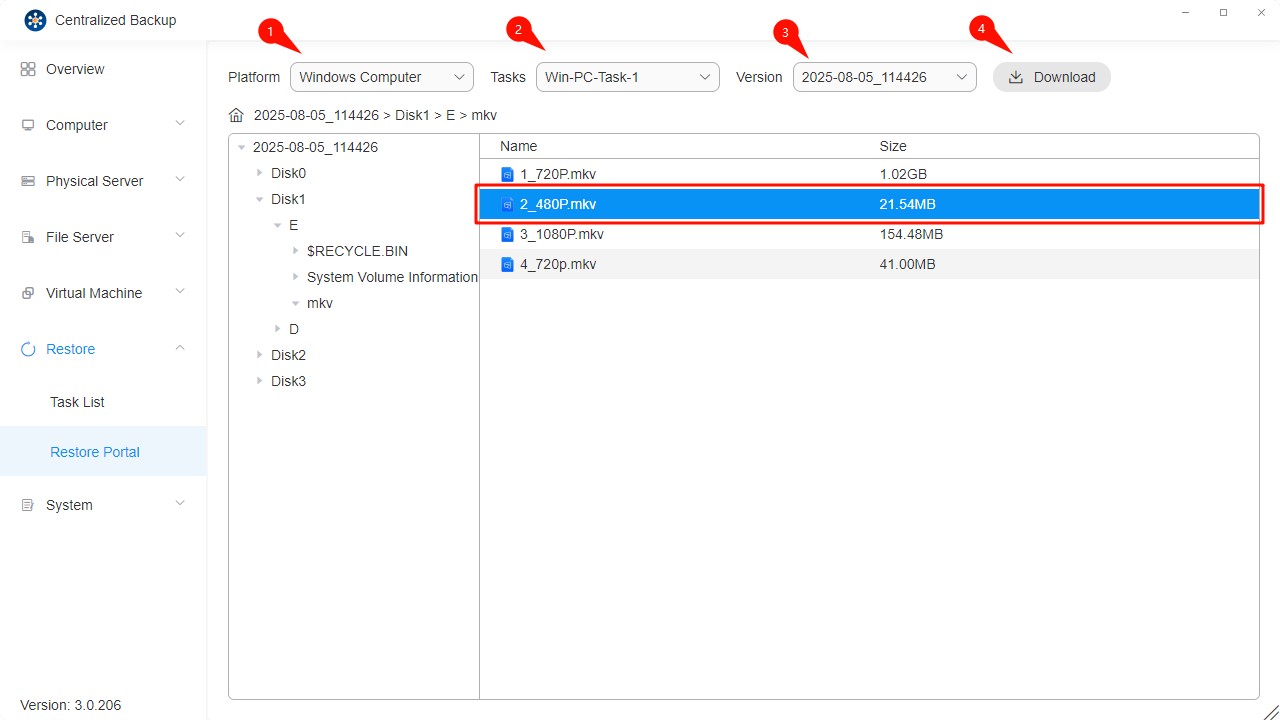
How to Restore Individual Files or Folders
Use the Restore Portal to recover specific files or folders:
- Go to the "Restore" section.
- Select the "Restore Portal" module.
- Choose the platform, backup task, and version to restore.
- Select the desired file or folder and click the "Download" icon in the top right corner.
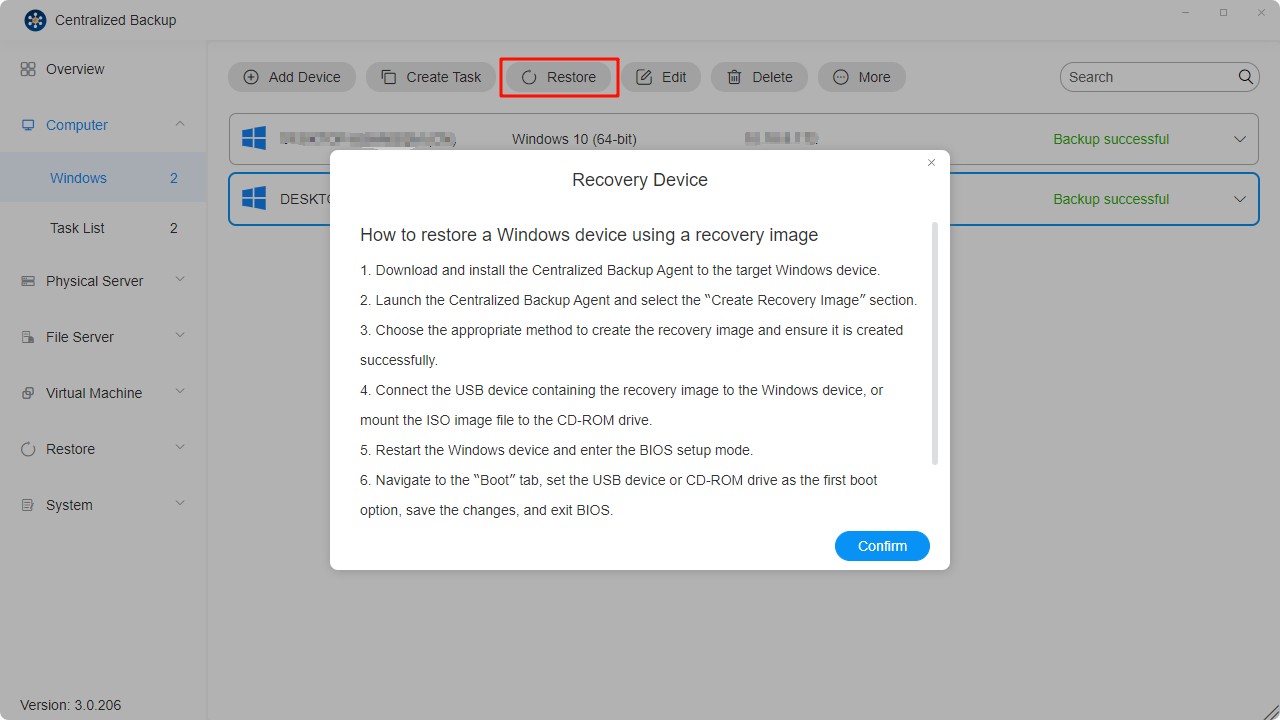
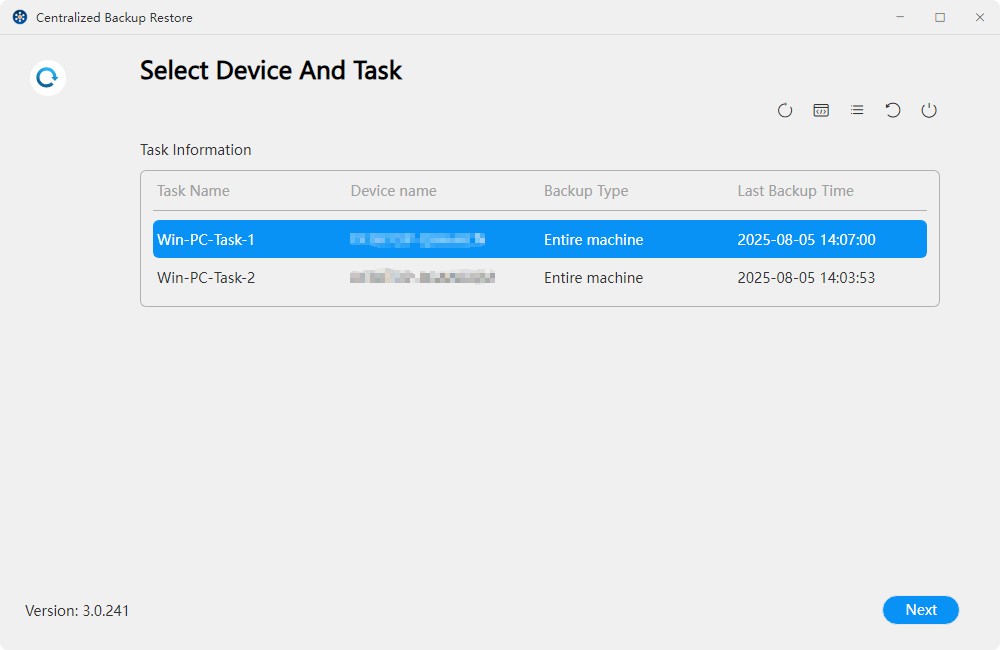
How to Restore an Entire Device
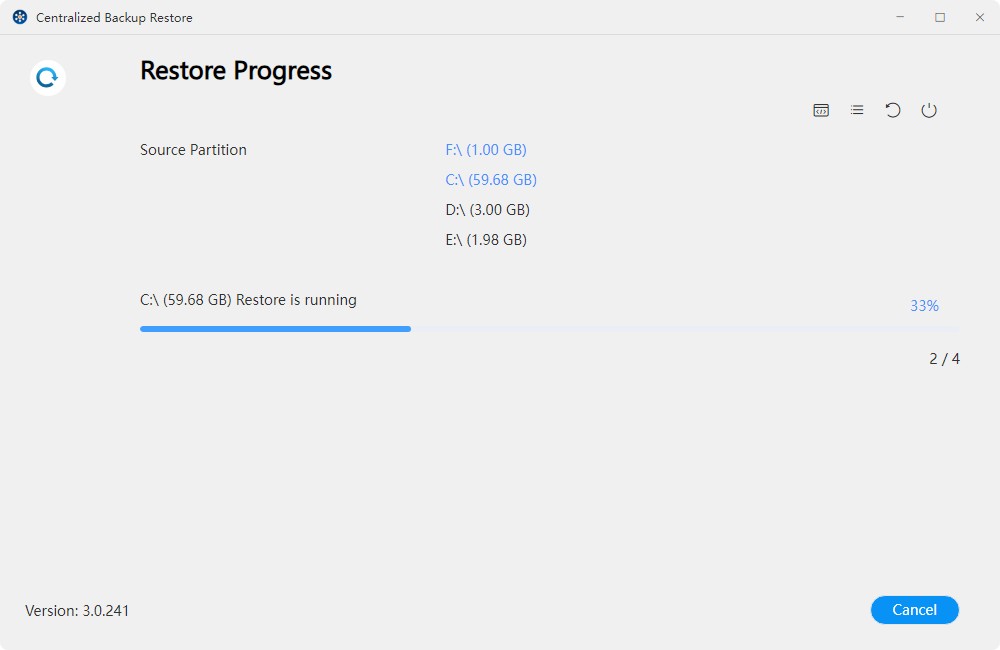
You can restore the entire device, operating system, or custom volumes through backup tasks. To restore an entire device or a backed-up storage volume, use the Centralized Backup Agent to create and execute a restore image.
- Run the restore image in Windows PE.
- Enter your TNAS credentials to connect to your TNAS.
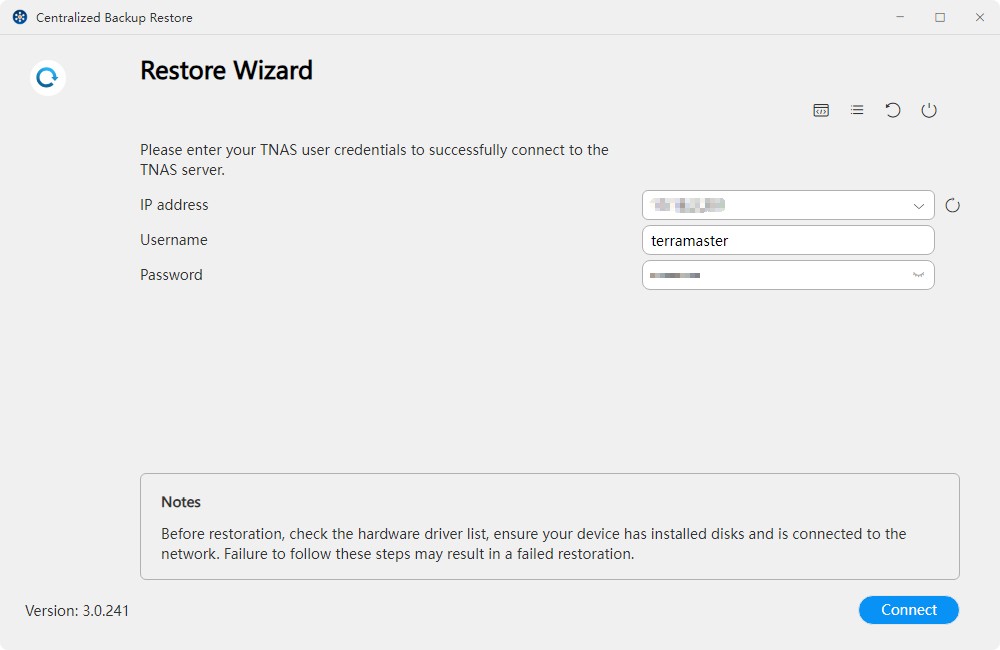
- Select the device and backup task to be restored.
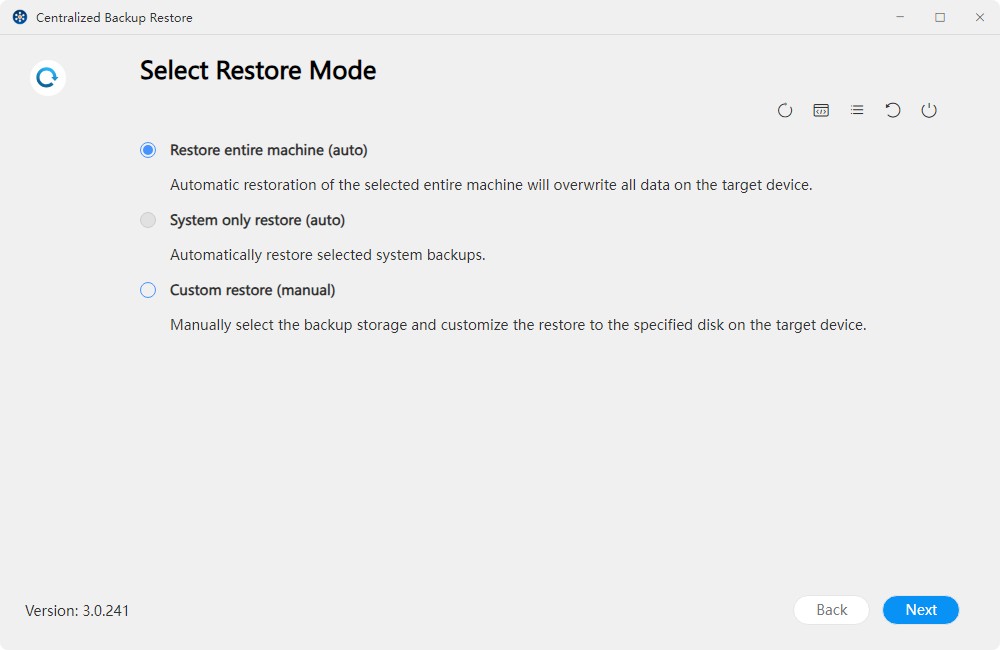
- Choose the restoration mode:
• Restore Entire Device (Automatic): Automatically restores the entire computer, including the operating system, partition information, and files within the partitions.
• Restore System Only (Automatic): Automatically restores the system and boot partitions (including the EFI partition).
• Custom Restore (Manual): Allows manual selection of specific partitions from all backed-up partitions on the target device.
- Select the version to be restored.
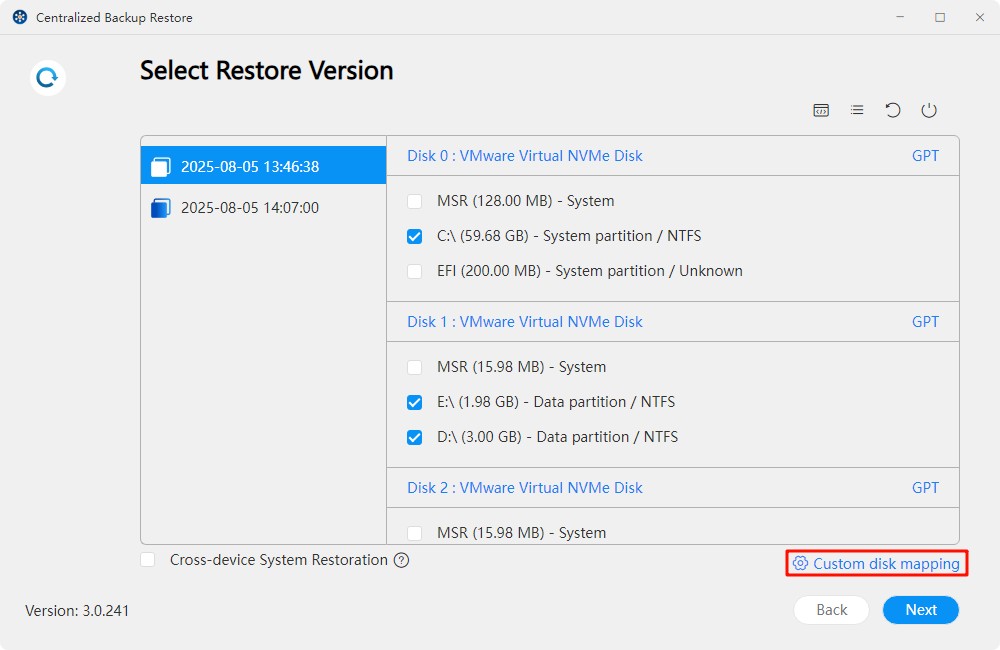
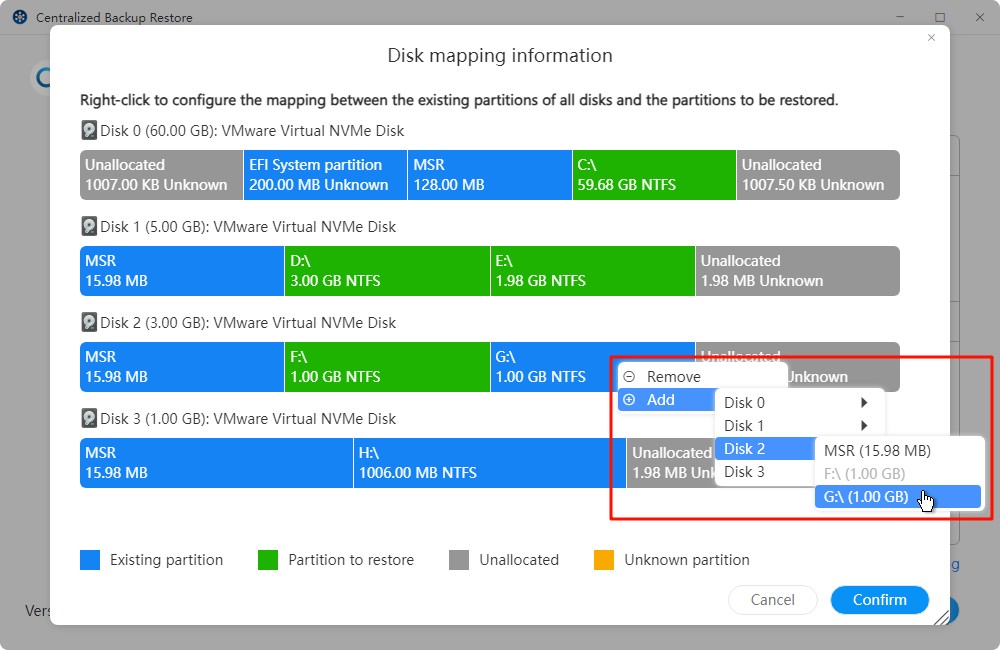
- Customize disk mapping.
- Confirm restoration settings.
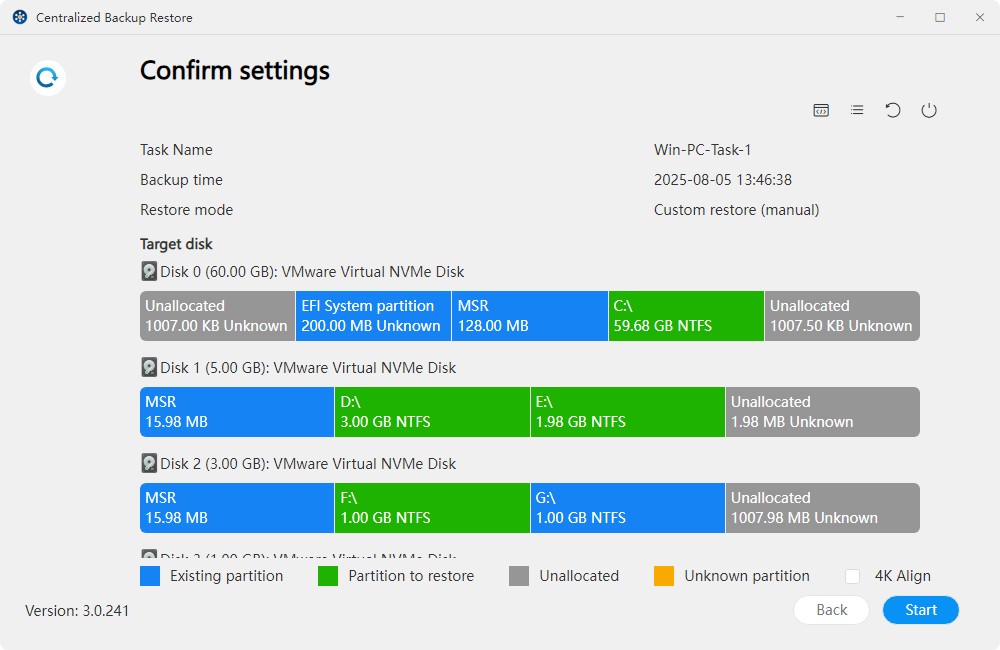
- Wait for the restoration process to complete.
Automatic restoration will overwrite the device's original partitions by default, whereas manual restoration will restore data to the custom-defined destination.
File Server
On this page, you can add new SMB/rsync file servers to Centralized Backup, create backup tasks, restore backup data, and manage these devices.
File Server Requirements and Limitations
- Supported Backup Versions:
Servers using SMB and rsync 3.0 or higher protocols (Linux) are supported.
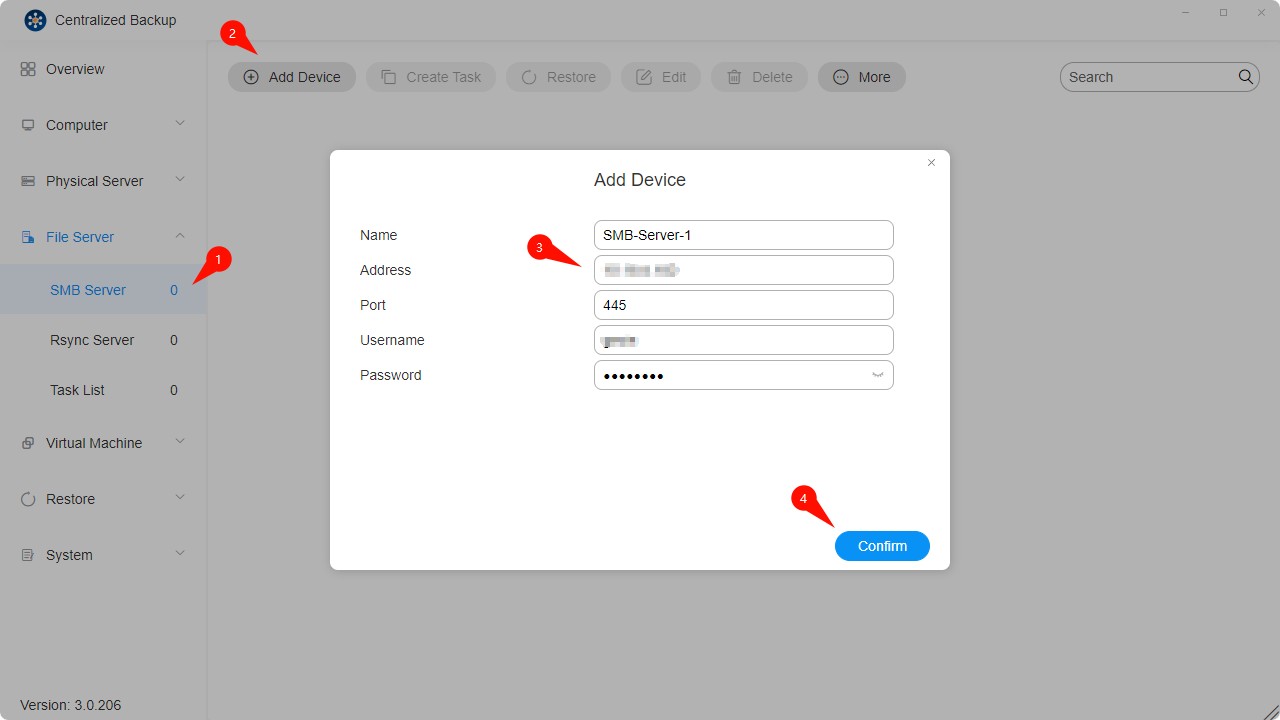
How to Add a File Server
- Select the "File Server - SMB Server" section.
- Click the "Add Device" button.
- Enter the server address, username, and password.
- Confirm the connection by clicking "Confirm."
- To transfer files via SMB, ensure that ports 139 (netbios-ssn), 445 (microsoft-ds), 137 (Nmbd), or 138 (Nmbd) are enabled on the source server.
- To back up another TNAS using SMB, log in to the source TNAS, go to Control Panel > File Services > SMB/AFP/NFS, enable the SMB service, and then click Apply.
- Ensure that "Network Neighborhood" is enabled on the SMB server.
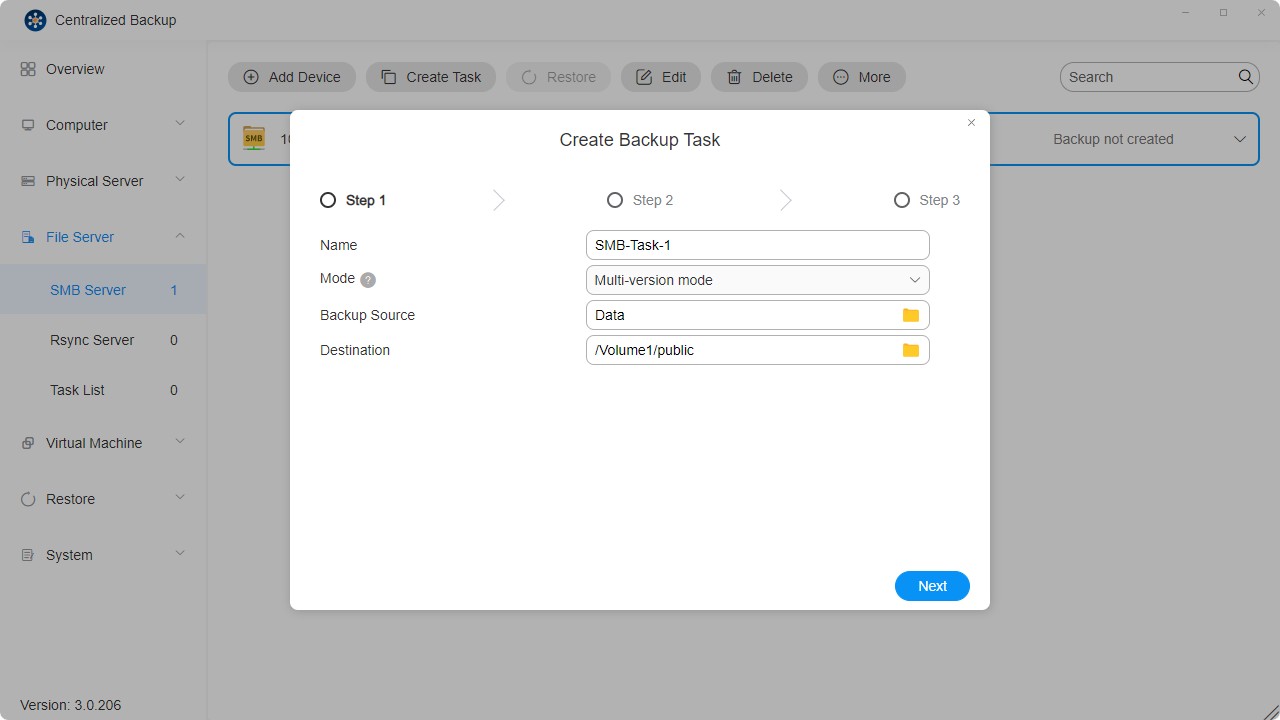
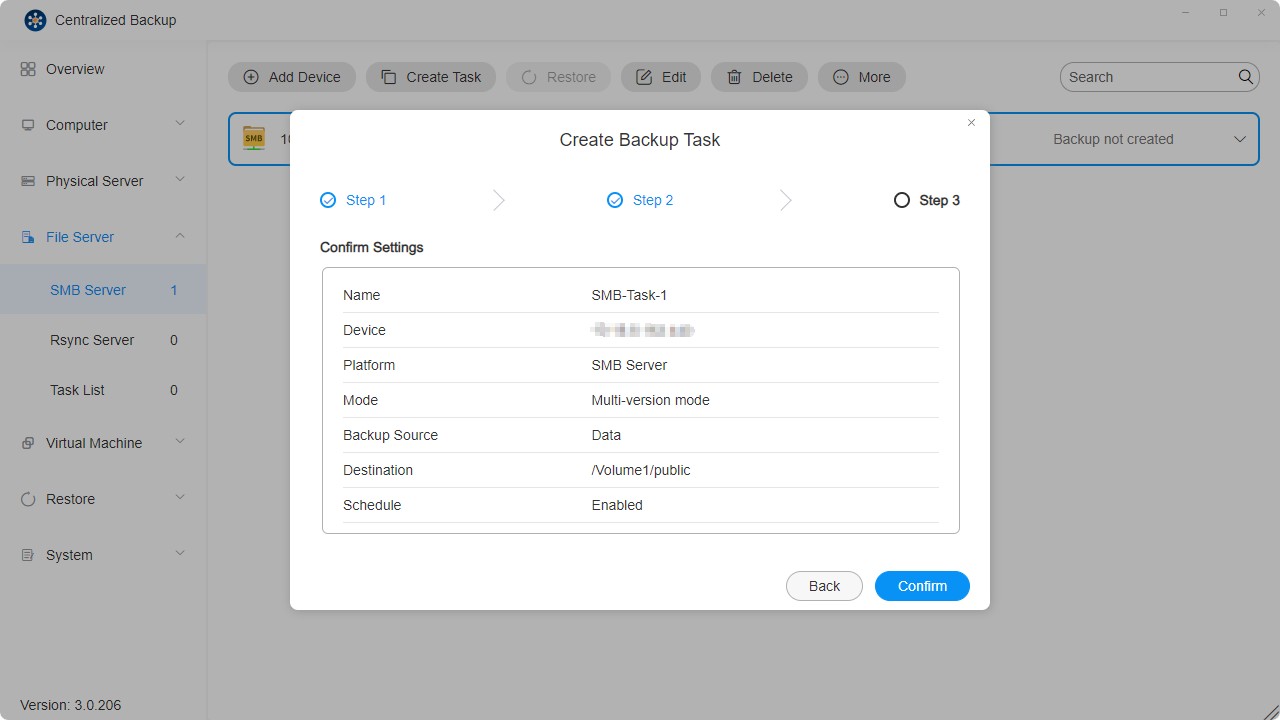
How to Create a File Server Backup Task
- Establish a connection between the target device and TNAS.
- Click the "Create Task" button.
- Configure the task settings—name, backup mode, source, and destination.
• Incremental Mode: Backs up only files that were added or modified since the last backup. Ideal for scenarios requiring high backup efficiency.
• Mirror Mode: Creates a full replica of the source data at the destination, fully mirroring files and directories. Suitable for ensuring data consistency.
• Multi-version Mode: Saves multiple full backup versions based on a timeline. Each version is independent and consumes more storage space. Ideal for scenarios requiring version control.
- Set the task schedule.
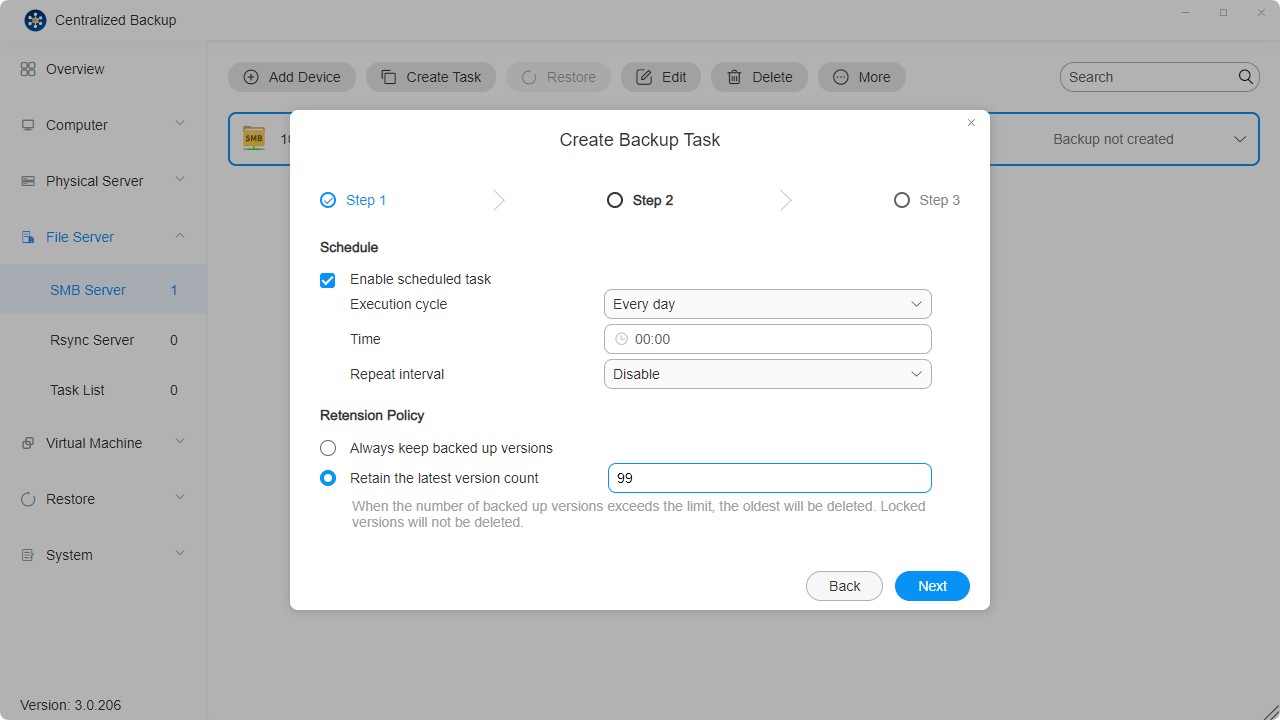
- Review and confirm the settings to complete the task creation.
- Each device supports the creation of multiple backup tasks.
- When a selected backup task is deleted, the backup data will not be removed from the destination.
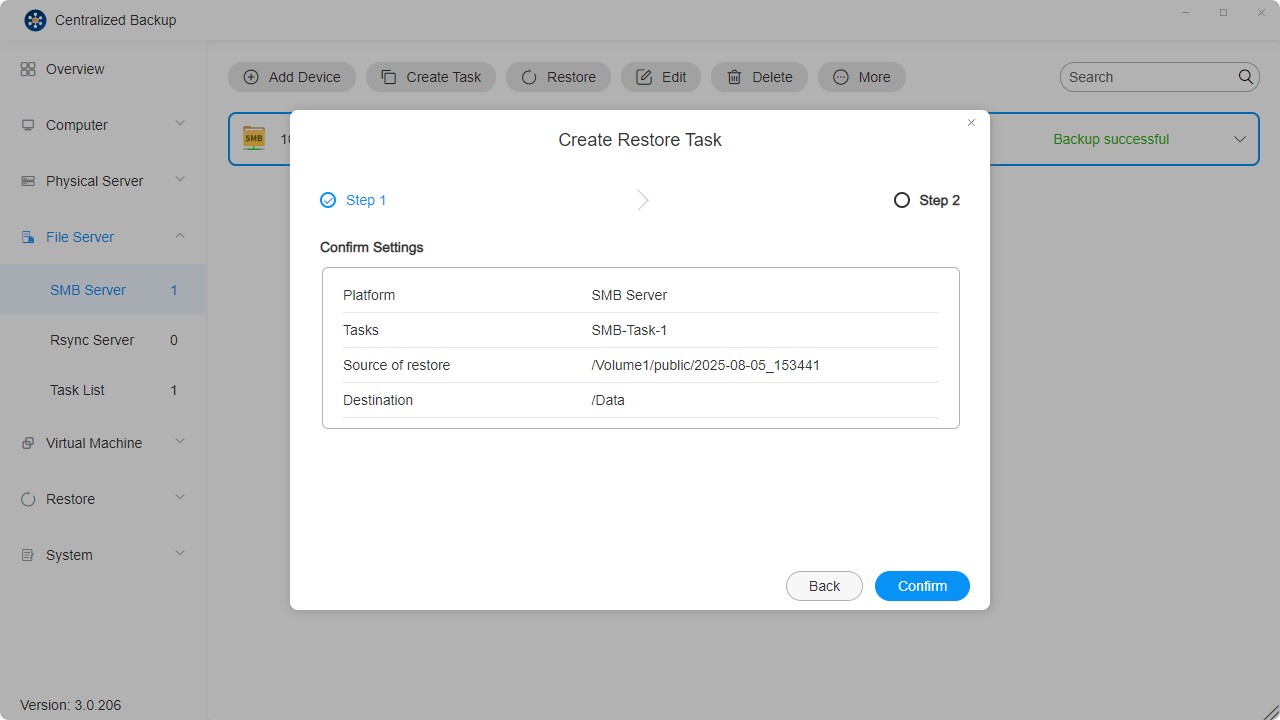
How to Create a File Server Restore Task
- Click the "Restore" button.
- Configure the general task settings—name, backup task, backup version, restore source, and destination.
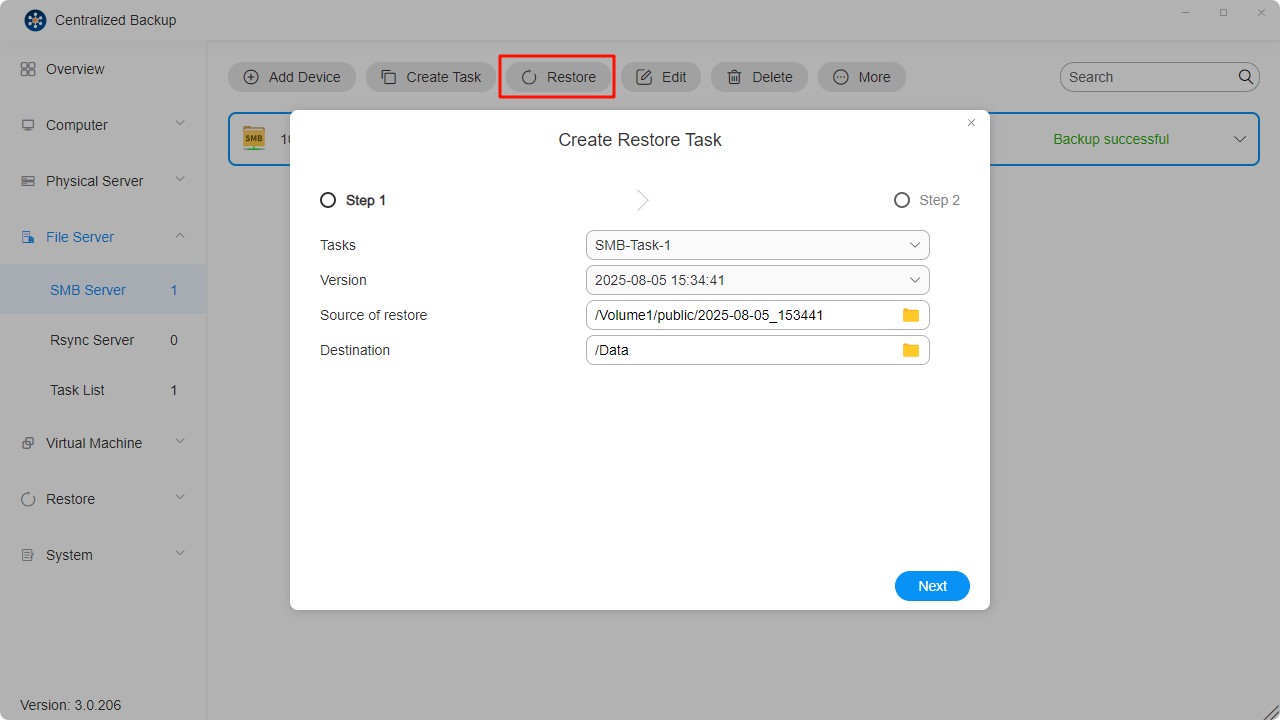
- Review and confirm the settings to complete the restore task creation.
VMware vSphere
On this page, you can add new VMware ESXi/VMware vCenter devices to Centralized Backup, create backup tasks, restore backup data, and manage these devices.
VMware vSphere Requirements and Limitations
-
Supported Versions:
ESXi: 8.0, 7.0, 6.7, 6.5
vCenter: 8.0, 7.0, 6.7, 6.5 -
Supported Virtual Machines:
All operating systems supported by VMware vSphere. -
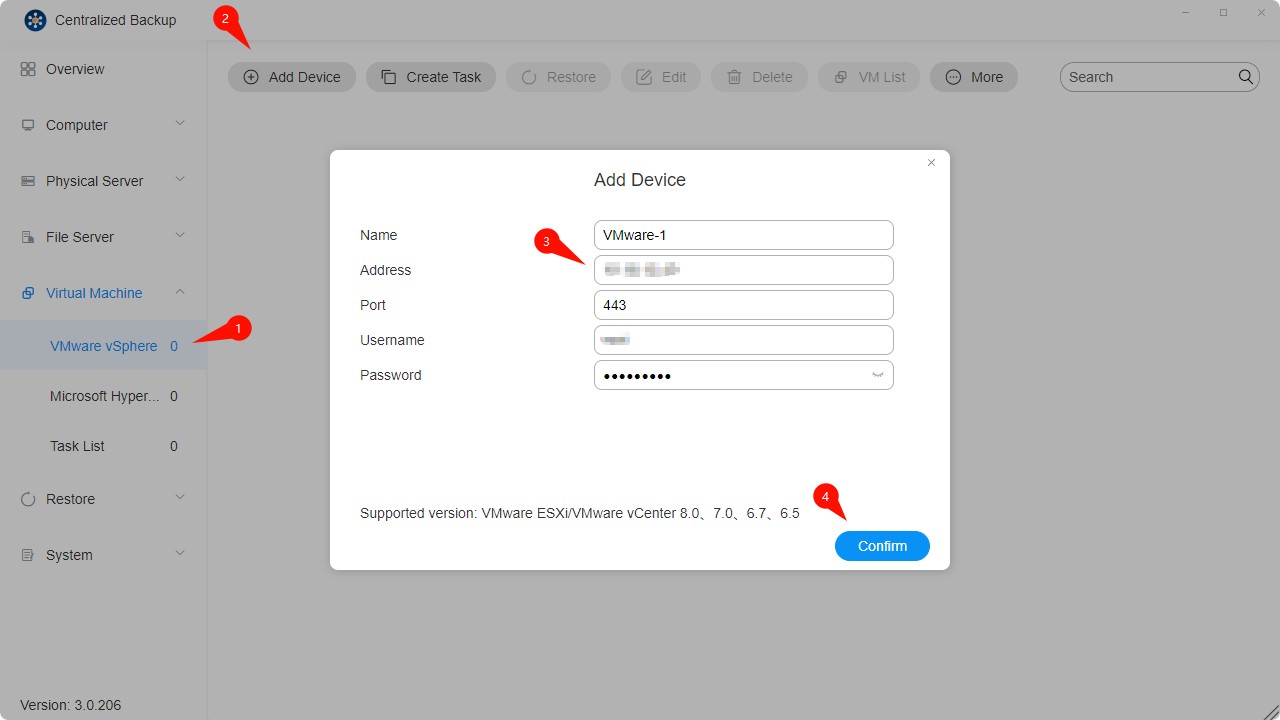
Network Port:
443
How to Add a VMware vSphere Device
- Select the "Virtual Machines - VMware vSphere" section.
- Click the "Add Device" button.
- Enter the server address, username, and password.
- Confirm the connection by clicking "Confirm."
- Adding devices via IPv6 addresses is not supported.
- SSH and ESXi Shell must be enabled on VMware ESXi to perform virtual machine backups.
- VMware ESXi/VMware vCenter accounts must have full administrative privileges.
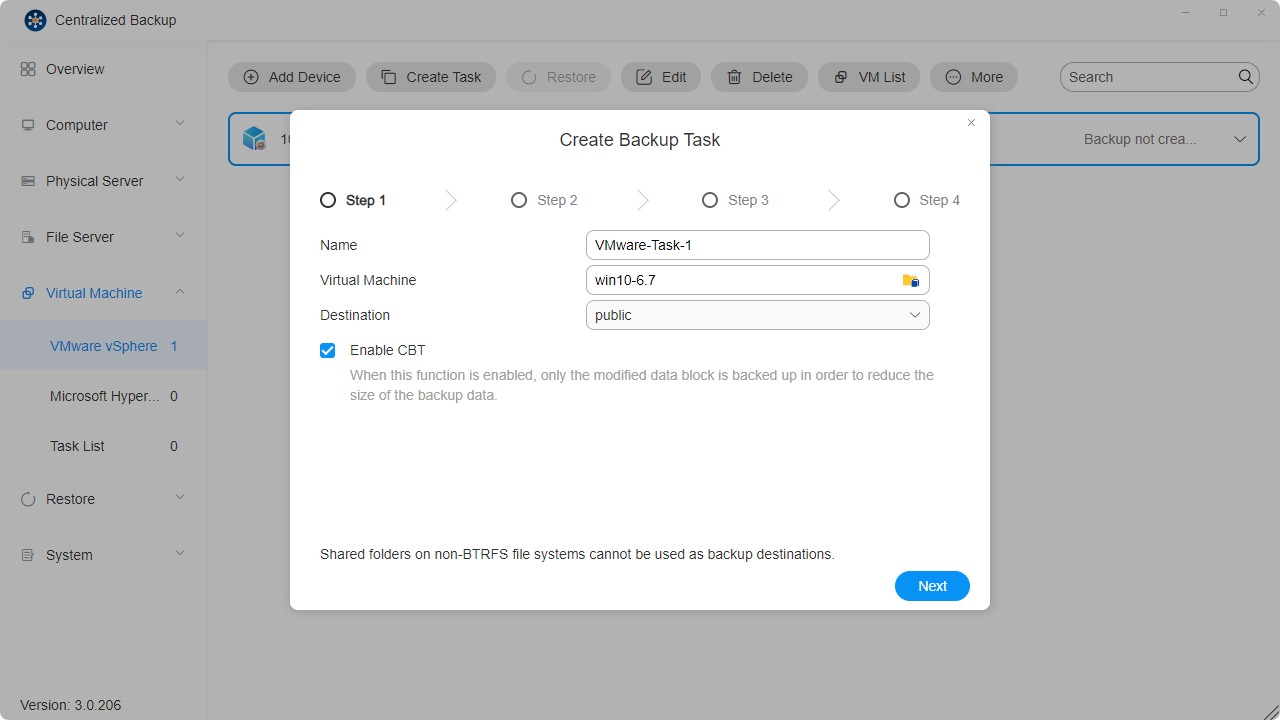
How to Create a VMware vSphere Backup Task
- Establish a connection between the target device and TNAS.
- Click the "Create Task" icon.
- Configure the general task information — name, virtual machines, and destination.
• You can select multiple virtual machines from multiple devices for backup.
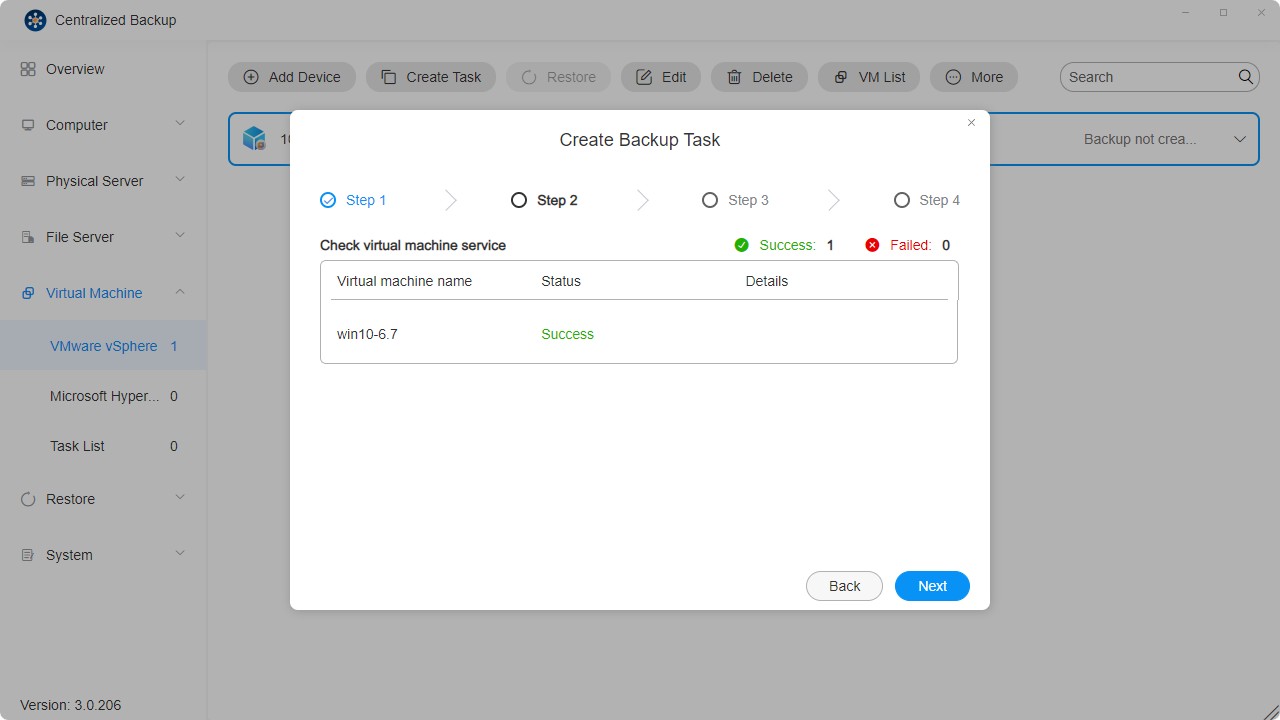
- Check the virtual machine services.
• The system will verify whether the required services on the VM are properly configured to ensure successful backup.
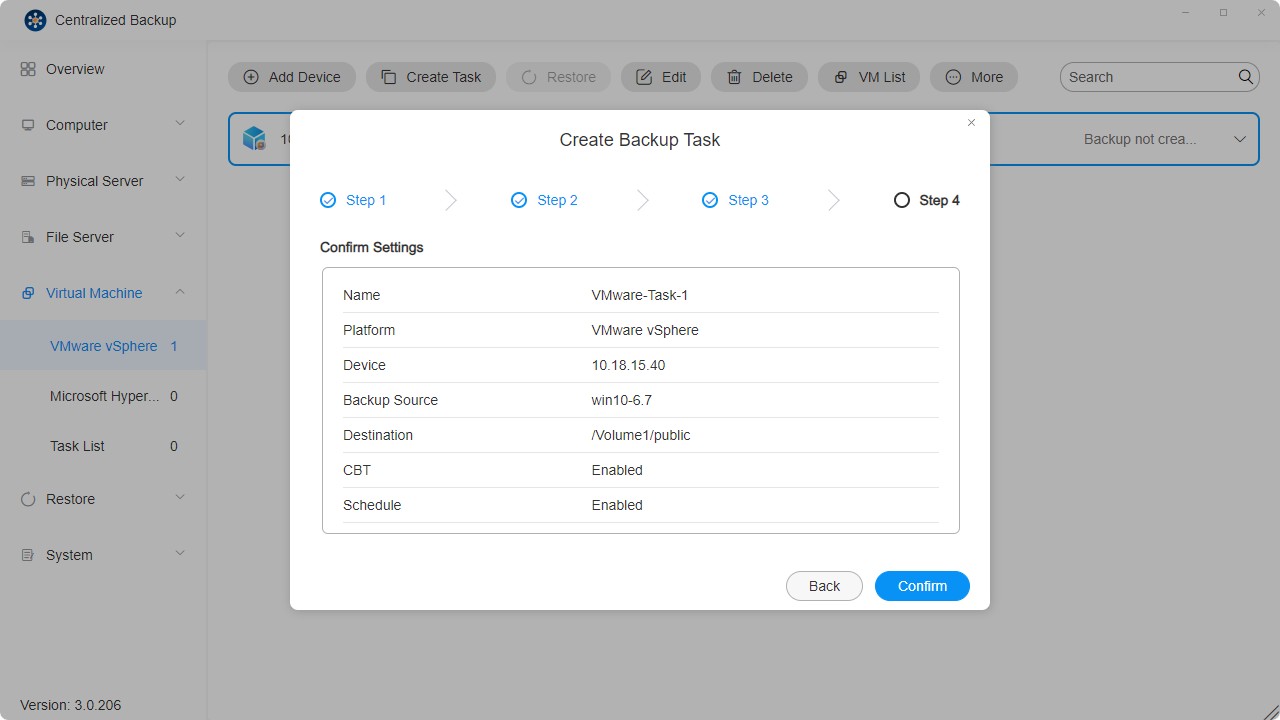
- Set up the task schedule.

- Confirm the settings and click "Confirm" to complete task creation.
- Each device supports multiple different backup tasks.
- When a selected backup task is deleted, its corresponding backup data will also be removed from the destination.
- Encrypted virtual machines (introduced in VMware vSphere 6.5) are not currently supported.
- Fault-tolerant virtual machines (introduced in VMware vSphere 6.0) are not currently supported.
- If task execution conflicts arise, the currently running task will take precedence. The schedule will shift to the next available cycle.
- If a backup version is locked, it will not be counted in the version retention quota, and cannot be replaced or deleted.
How to Manually Enable CBT for a Virtual Machine
- Power off the virtual machine. You must shut it down to complete the settings successfully.
- Right-click on the VM and select Edit Settings.
- Go to the VM Options tab.
- Click Advanced, then click Edit Configuration next to Configuration Parameters.
- Click Add parameters, add the ctkEnabled parameter, and set its value to true.
- Click Add parameters, add SCSI0:0.ctkEnabled, and set its value to true.
- Power on the virtual machine.
- In the VM's root directory, verify that each CBT-enabled disk has a vmname-ctk.vmdk file.
- These steps may vary slightly depending on the VMware vSphere version.
- When a new disk is added to a VM, it is assigned a SCSI device. SCSI0:0.ctkEnabled refers to one such device. Other examples include SCSI0:1 or SCSI1:1.
- CBT can be enabled or disabled individually for each disk.
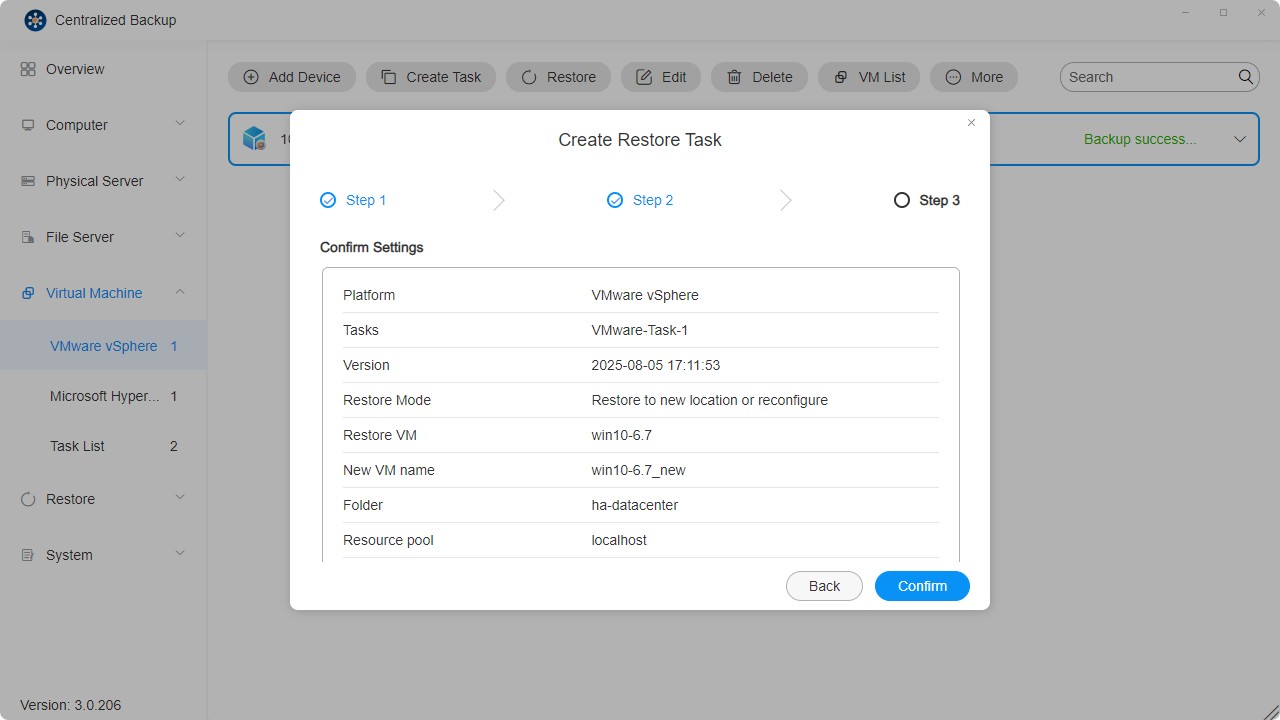
How to Create a VMware vSphere Restore Task
- Click the "Restore" button.
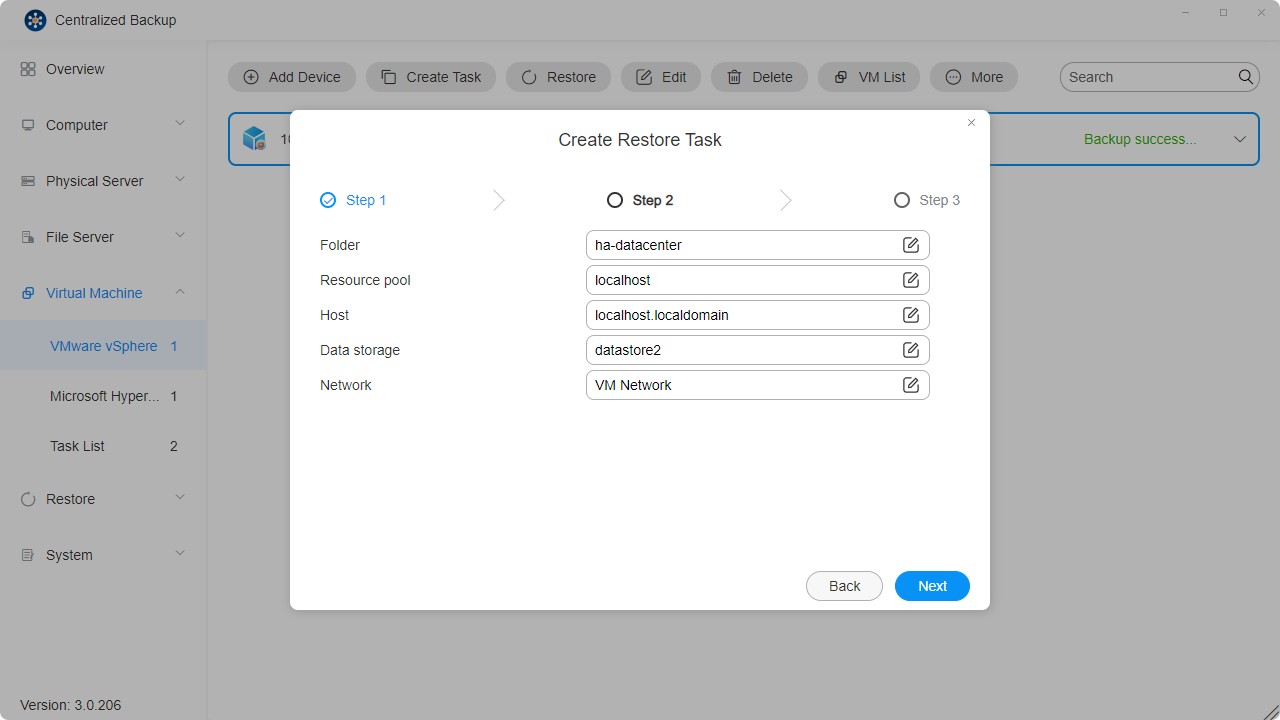
- Configure the general task information — name, backup task, version, restore target VM, restore method, and new VM name.
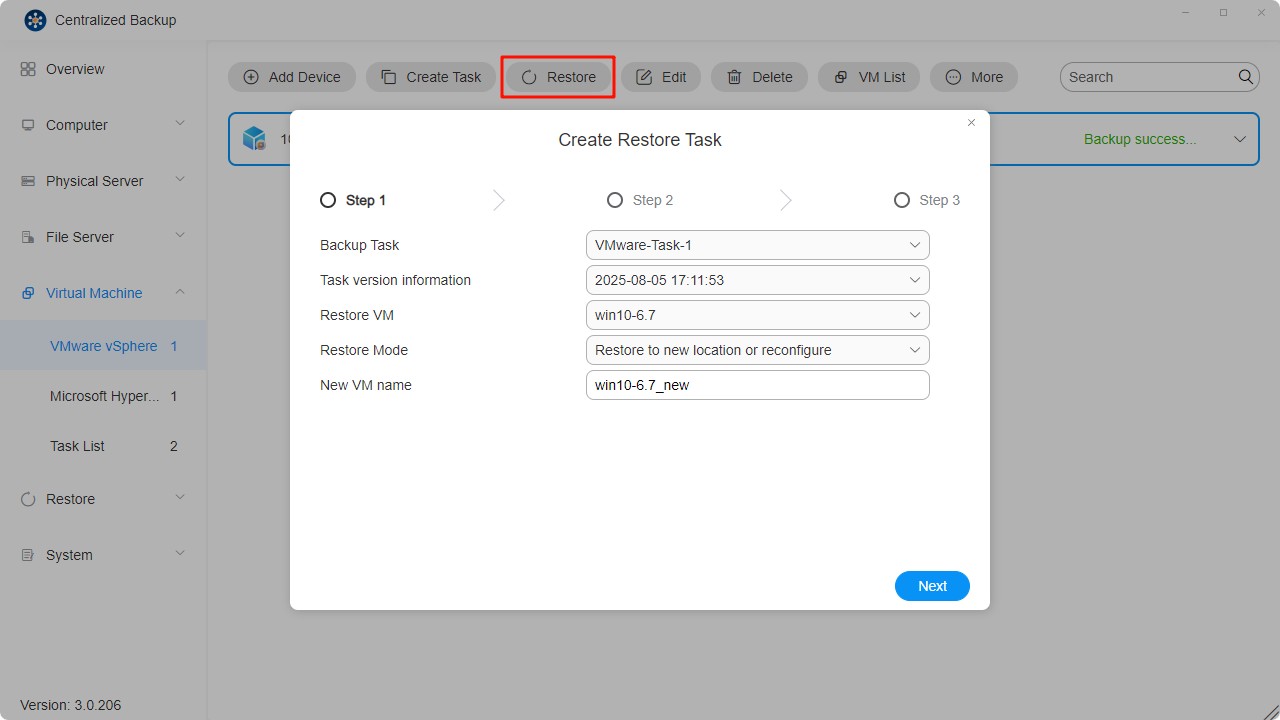
- Restore to Original Location: Restores the selected VM to its original location, retaining its original name and settings. This minimizes the risk of misconfiguration and unregisters and replaces the original VM in the production environment.
- Restore to New Location: Allows customization of the destination and settings for the restored VM (including folder, hypervisor, resource pool, datastore, and network).
- Confirm the settings and click "Confirm" to complete the restore task creation.
Currently, only single virtual machine restore is supported.
Microsoft Hyper-V
On this page, you can add new Microsoft Hyper-V devices to Centralized Backup, create backup tasks, restore backup data, and manage these devices.
Microsoft Hyper-V Requirements and Limitations
-
Supported Versions:
Windows Server Hyper-V 2019
Windows Server Hyper-V 2016 -
Supported Virtual Machines:
All operating systems supported by Hyper-V. -
Network Port:
5985
How to Add a Microsoft Hyper-V Device
- Select the "Virtual Machines - Microsoft Hyper-V" section.
- Click the "Add Device" button.
- Enter the server address, username, and password.
- Confirm the connection by clicking "Confirm."

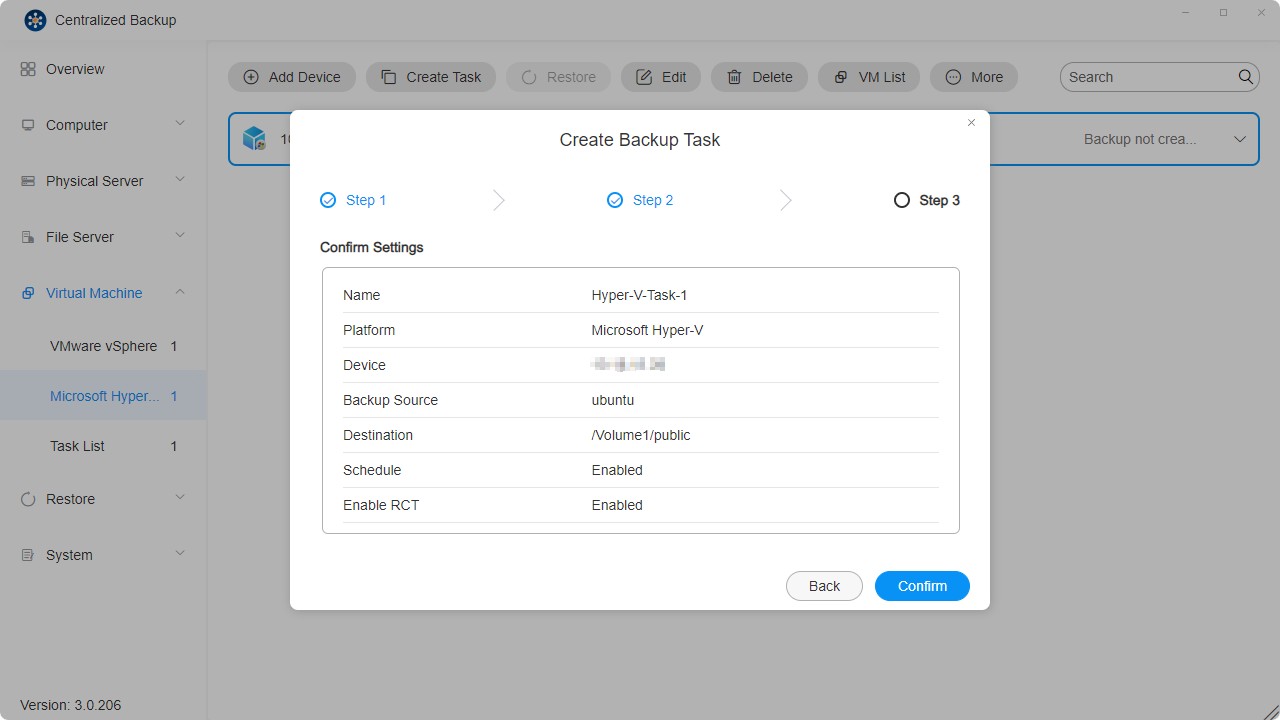
How to Create a Microsoft Hyper-V Backup Task
Since certain built-in Windows services are required for performing backup and restore operations, the following Windows services must be enabled: WinRM service, SMB v2/v3, administrative shares, and PowerShell script permissions.
Note: Some settings are enabled by default. If you have not modified these configurations after installation, no additional setup is required.
- Establish a connection between the target device and TNAS.
- Click the "Create Task" button.
- Configure the general task information — name, select device, virtual machines, and destination.
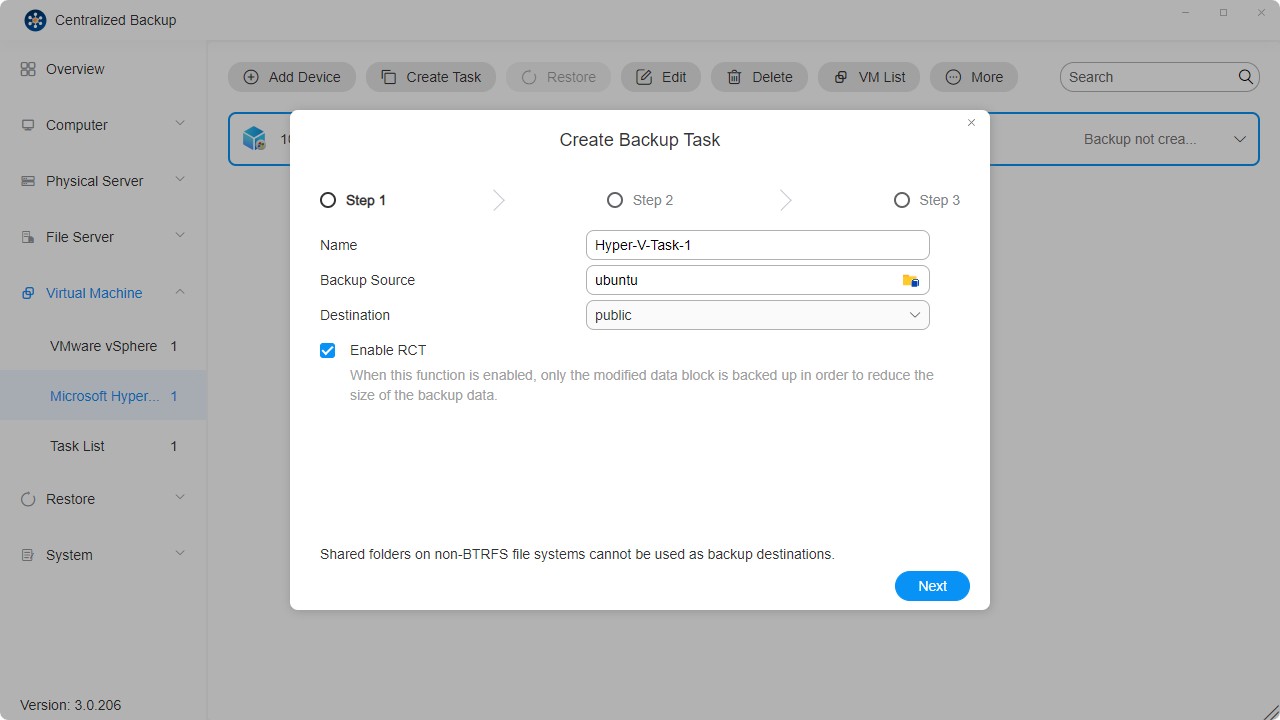
- Set up the task schedule.
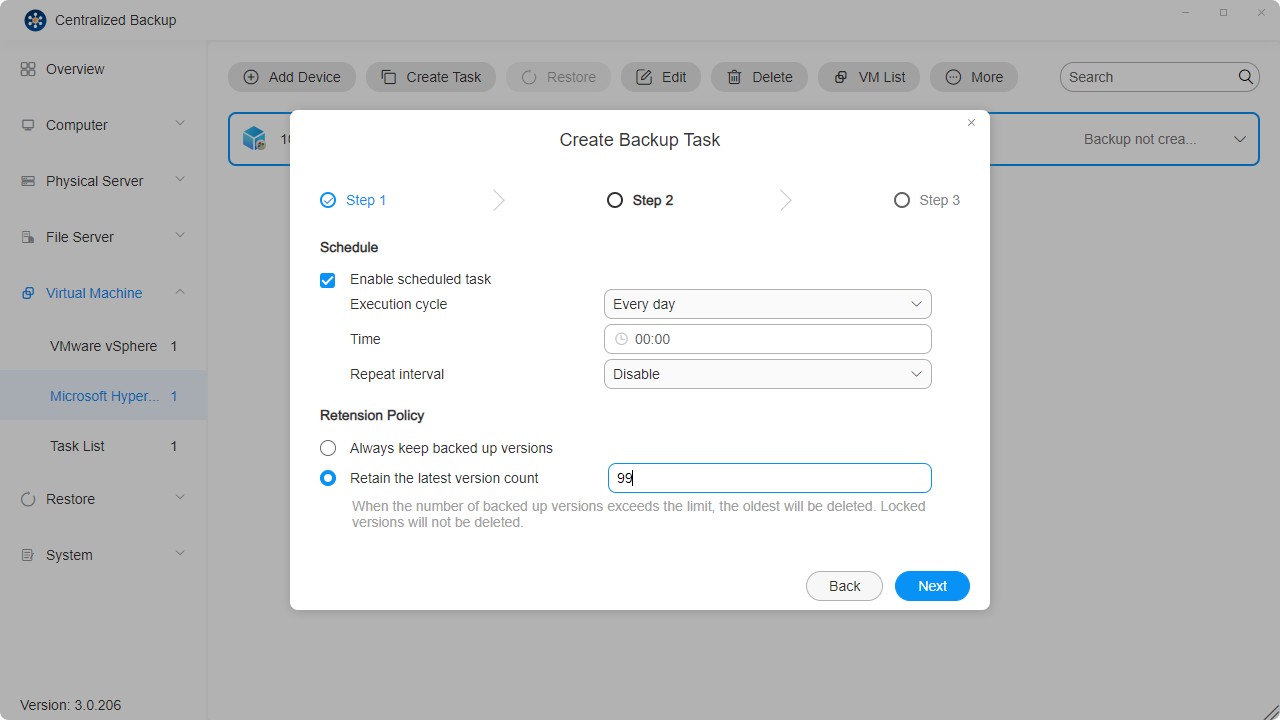
- Confirm the settings and click "Confirm" to complete task creation.
How to Create a Microsoft Hyper-V Restore Task
- Select the Restore module.
- Click the "Create" icon in the upper right corner.
- Configure the general task information — name, backup task, version, restore virtual machine, restore method, and new VM name.
• Restore to Original Location: Restores the selected VM to its original location using the same name and settings. This minimizes the risk of user errors and replaces the original VM in the production environment.
• Restore to New Location: Allows customization of the restored VM's destination and settings (folder, datastore) for deployment.

- Confirm the settings and click "Confirm" to complete restore task creation.

Logs
In this section, you can manage application logs in Centralized Backup.
Log Management
You can view logs across the entire application and perform the following operations:
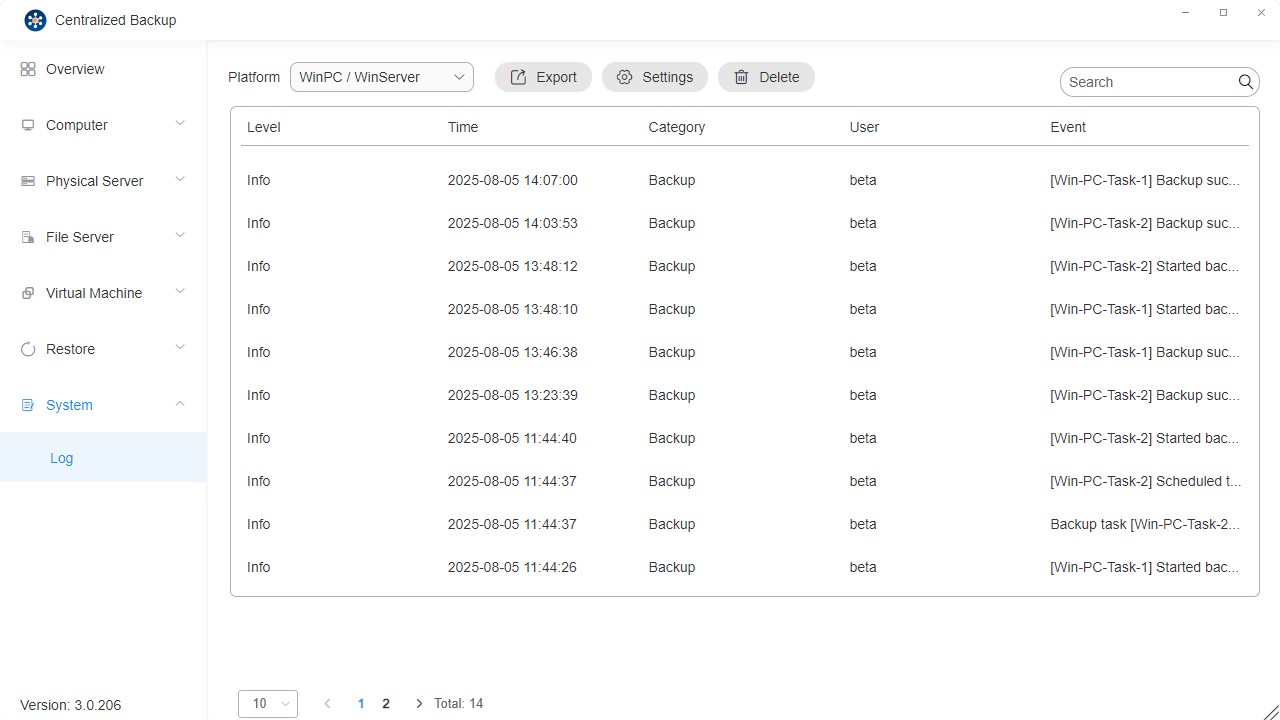
- Platform: Filter by device type.
- Export: Export event logs and debug logs.
- Settings: Configure log retention policies. Logs that do not meet the policy will be deleted automatically.
- Search: Search for specific task events.
- Delete: Delete task logs; you may also delete all task logs.