Storage Pool
With TNAS, you can consolidate multiple disks into a unified storage device called a storage pool. From this pool, you can easily create volumes and expand them if space is available. TNAS also supports various RAID configurations, offering diverse levels of data protection.
Management
Through the buttons in the management tab, you can perform the following operations:
- Create: Establish a storage pool;
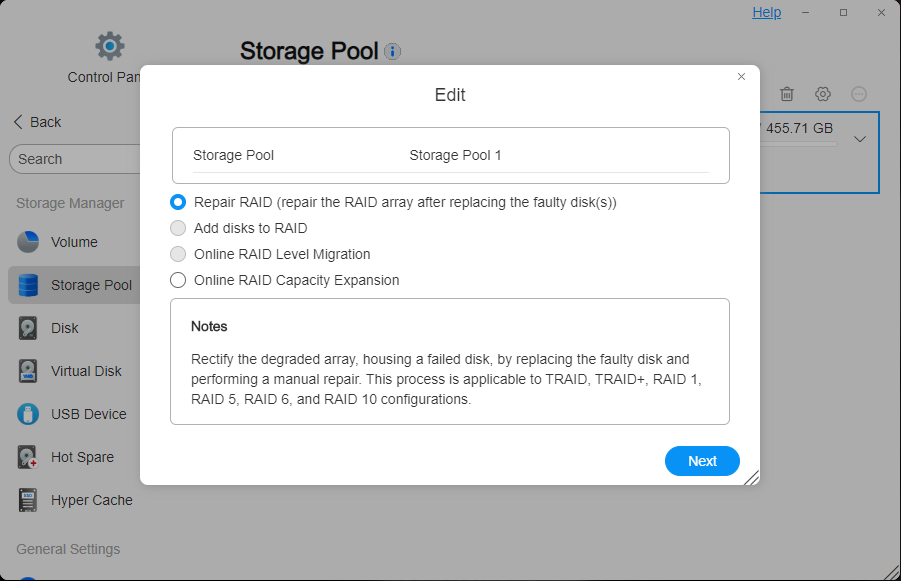
- Edit: Adjust storage pool configurations, which include:
Repair RAID: Fix degraded arrays with faulty disks.
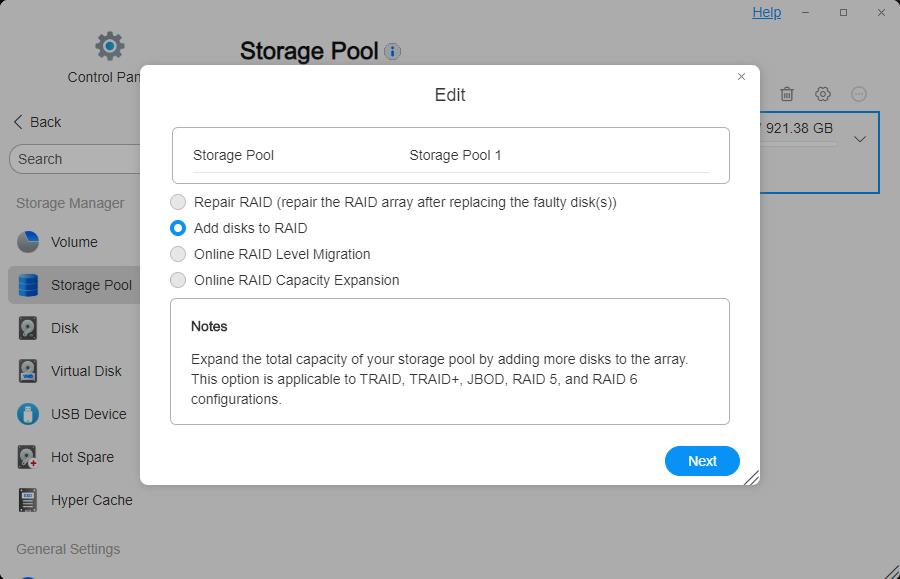
Add disks to RAID: Increase storage pool capacity by adding additional disks to the array.
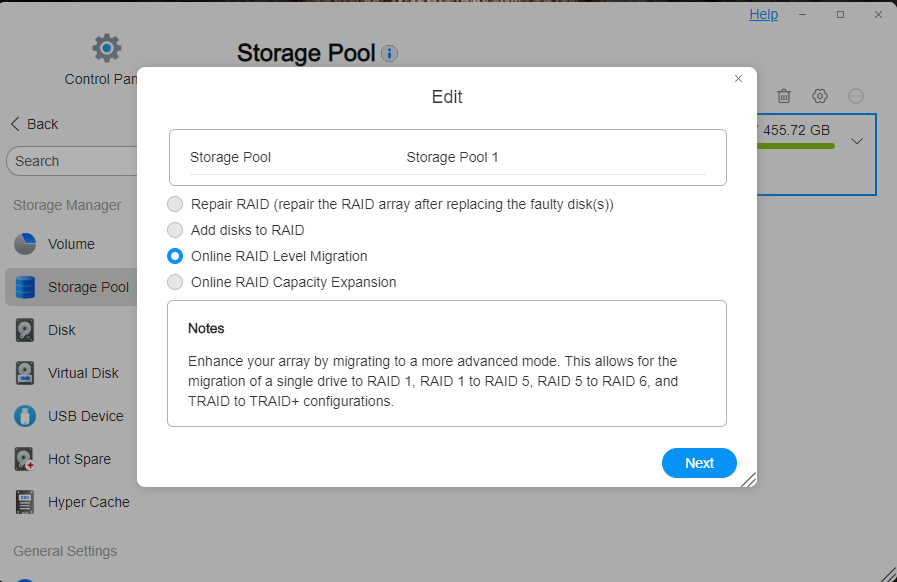
Online RAID Level Migration: Upgrade the array to a higher-level mode.
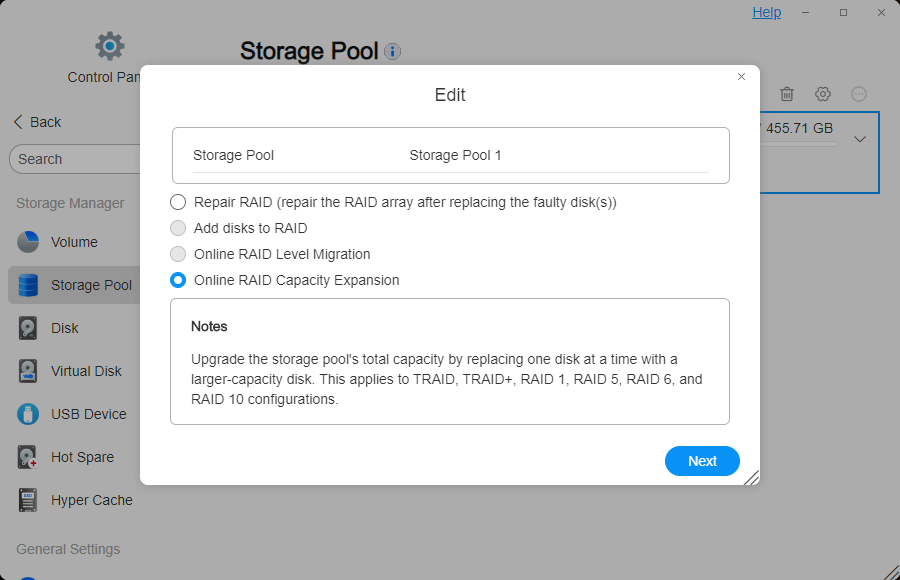
Online RAID Capacity Expansion: Enhance storage pool capacity by substituting disks with greater capacity ones individually. - Delete: Remove the storage pool.
- Settings: Configure array synchronization speed and enable/disable RAID rapid repair.
- Data Scrubbing: Helps maintain data integrity and improves storage space efficiency. Note: Data Scrubbing will reduce storage performance. It is recommended to run data cleaning during off-peak hours.
- RAID repair is compatible with TRAID (non-single disk), TRAID+, RAID 1, RAID 5, RAID 6, and RAID 10 configurations.
- Add disks to RAID is compatible with TRAID,TRAID+,JBOD,RAID 5,RAID 6 configurations.
- Online RAID level migration supports upgrading the array to higher-level modes. Single disks can migrate to RAID 1, RAID 1 can progress to RAID 5, RAID 5 can advance to RAID 6, and TRAID can upgrade to TRAID+. RAID 1 must first upgrade to RAID 5 before advancing to RAID 6; single mode can upgrade only to RAID 1 and not directly to RAID 5.
- Online RAID capacity expansion is compatible with TRAID, TRAID+, RAID 1, RAID 5, RAID 6, RAID 10 configurations.
- Prior to deleting a storage pool, all volumes within the pool must be deleted. If a HyperLock volume exists within the storage pool, both the HyperLock volume and the storage pool cannot be deleted simultaneously.
- Data Scrubbing is supported for:RAID 1, RAID 5, RAID 6, RAID 10.
Why is the editing function for the storage pool still unavailable after inserting a new disk?
If the capacity of the newly inserted disk does not meet the minimum requirement for editing the storage pool, the editing function will remain disabled. Make sure the new disk's capacity is at least equal to the smallest capacity disk in the storage pool.
I don't want to use the default TRAID. How can I change the RAID type?
If no storage pool has been created: Go to Control Panel > Storage Manager > Storage Pool, click Create Storage Pool, and select the desired RAID type from the RAID type dropdown menu.
If a storage pool has already been created: Change the RAID type through online RAID migration, or delete the current storage pool and create a new one.
How to Repair RAID?
Applicable Scenario: A disk in the TNAS device has failed, causing the array to degrade. The TNAS emits a beep-beep sound, a degradation notification pops up in the TOS desktop messages, and the storage pool interface shows Array Degraded.
Applicable Array Types: TRAID, TRAID+, RAID1, RAID5, RAID6, RAID10.
Steps:
- Log in to the TOS system, go to Desktop > Message Notifications, locate, and identify the failed disk.
- Press the power button briefly to turn off the TNAS. Wait until the power indicator goes out, remove the faulty disk, and insert a new disk. The capacity of the new disk must be equal to or larger than the smallest disk in the current storage pool.
- Press the power button briefly to turn on the TNAS. Navigate to TOS Control Panel > Storage Manager > Storage Pool > Edit > Repair RAID, select the disk, confirm the settings, and wait for the array synchronization to complete.
How to Add disks to RAID?
Applicable Scenario: Increase the capacity of an array (storage pool) by adding disks to the existing array without changing the array mode.
Applicable Array Types: TRAID, TRAID+, JBOD, RAID 5, RAID 6.
Steps:
- Press the power button briefly to turn off the TNAS. Wait until the power indicator goes out, insert a new disk into the TNAS, and ensure that the capacity of the new disk is equal to or larger than the smallest disk in the array.
- Press the power button briefly to turn on the TNAS. Navigate to Control Panel > Storage Manager > Storage Pool > Edit > Add disks to RAID > Select Disk (only one disk can be selected at a time) > Confirm Settings.
- Go to Control Panel > Storage Manager > Volume, click the "Edit" button, and adjust the volume capacity as needed.
How to Perform Online Array Level Migration?
Applicable Scenario: Upgrade the existing array mode to a RAID mode with a higher security level while preserving the current data.
Applicable Array Types: TRAID, Single, RAID 1, RAID 5.
Steps for migrating TRAID to TRAID+: Refer to the following link: https://forum.terra-master.com/en/viewtopic.php?t=6404
Steps for migrating other array types:
- Press the power button briefly to turn off the TNAS. Wait until the power indicator goes out, insert a new disk with a capacity no less than the smallest disk in the current array.
- Press the power button briefly to turn on the TNAS. Navigate to Control Panel > Storage Management > Storage Pool > Edit > Online Array Migration > Select Disk > Confirm Settings.
- Go to TOS Control Panel > Storage Management > Volume > Edit, and adjust the volume capacity as needed.
How to Perform Online Array Capacity Expansion?
Applicable Scenario: Replace smaller disks with larger ones to increase the usable capacity of the array without changing the total number of disks.
Applicable Array Types: TRAID, TRAID+, RAID 1, RAID 5, RAID 6.
Steps:
- Press the power button briefly to turn off the TNAS. Wait until the power indicator goes out, remove the disk to be replaced, and insert a larger-capacity disk.
- Press the power button briefly to turn on the TNAS. You will hear continuous beep-beep sounds, and the message center will report an array degradation message. Go to the right side of the TOS desktop to disable the buzzer.
- Navigate to TOS Control Panel > Storage Manager > Storage Pool (displayed as degraded at this point) > Edit > Select Array Expansion > Select the newly added disk > Confirm Settings.
- If you need to replace multiple disks, wait for the array synchronization to complete, then repeat steps 1, 2, and 3.
- Go to TOS Control Panel > Storage Management > Volume > Edit, and adjust the volume capacity as needed.
RAID mode
TRAID
TRAID is the abbreviation of TerraMaster RAID. TRAID is a flexible disk array management tool developed by TerraMaster. It has features such as the automatic combination of disk space, hard disk failure redundancy protection, and automatic capacity expansion. All these features do not require manual configuration by the user, and the system will automatically complete the configuration according to the properties of the hard disk. TRAID provides users with an optimized, flexible and elastic disk array management solution, especially suitable for new users who are not proficient in how to configure a disk array.
To learn more about TerraMaster TRAID
| Feature | Description |
|---|---|
| Advantages | Has the benefits of RAID 5 and offers higher storage efficiency compared to RAID 5. |
| Disadvantages | Write performance is lower than RAID 0 and other RAID modes without parity. |
| Data Loss Protection | Allows failure of 1 disk (when the array contains two or more disks). |
| Array Migration | Can be migrated to TRAID+. |
| Minimum Disk Count | 1 |
| Disk Capacity | Determined by disk conditions, system-optimized capacity |
TRAID+
TRAID+ not only inherits TRAID's outstanding features but also breaks new ground in redundancy protection. While traditional TRAID ensures failure redundancy for one hard drive, TRAID+ doubles this safeguard to cover two drives, significantly bolstering data security. This enhancement positions TRAID+ as the premier choice for users prioritizing data integrity.
| Feature | Description |
|---|---|
| Advantages | Has the benefits of RAID 6 and offers higher storage efficiency compared to RAID 6. |
| Disadvantages | Write performance and storage efficiency are lower than TRAID. |
| Data Loss Protection | Allows failure of 2 disks. |
| Array Migration | Not migratable. |
| Minimum Disk Count | 4 |
| Disk Capacity | Determined by disk conditions, system-optimized capacity |
Single
Single is the simplest storage configuration, where the system uses a single disk for data storage without involving any redundancy, striping, or aggregation features.
| Feature | Description |
|---|---|
| Advantages | High storage utilization, with all disk capacity available and no waste. Low cost, as it only involves one disk. |
| Disadvantages | No redundancy, no read/write performance optimization. |
| Data Loss Protection | All data is lost if the disk fails. |
| Array Migration | Can be migrated to RAID 1. |
| Minimum Disk Count | 1 (only one disk can be selected for creation) |
| Disk Capacity | 1 x (Disk Capacity) |
JBOD
JBOD (Just a Bunch of Disks) is a storage configuration where multiple independent disks are combined. Unlike RAID, JBOD does not provide striping or redundancy.
| Feature | Description |
|---|---|
| Advantages | High storage utilization, with all disk capacity available and no waste. |
| Disadvantages | No redundancy, and read/write performance is not improved compared to a single disk. |
| Data Loss Protection | Failure of any single disk will result in the loss of data stored on that disk. |
| Array Migration | Not migratable. |
| Minimum Disk Count | 2 |
| Disk Capacity | Total capacity of all disks |
RAID 0
RAID 0 is a RAID configuration that improves performance through data striping. It divides data into chunks and distributes them across multiple disks.
| Feature | Description |
|---|---|
| Advantages | The highest read/write performance among all RAID levels. High storage utilization, with all disk capacity available and no waste. |
| Disadvantages | Low reliability, no redundancy. |
| Data Loss Protection | Failure of any single disk will result in the loss of all data in the entire RAID 0 array. |
| Array Migration | Not migratable. |
| Minimum Disk Count | 2 |
| Disk Capacity | Total capacity of all disks |
RAID 1
RAID 1 is a RAID configuration based on mirroring, which achieves redundancy by replicating data in real-time across two or more hard drives. Each disk holds identical data, so if one disk fails, the data can still be fully recovered from its replica.
| Feature | Description |
|---|---|
| Advantages | High data reliability, as data is fully replicated to all disks, with each disk holding the same data copy. |
| Disadvantages | Low storage efficiency, high cost. |
| Data Loss Protection | As long as at least one disk is intact, data will not be lost. |
| Array Migration | Can be migrated to RAID 5. |
| Minimum Disk Count | 2 |
| Disk Capacity | Capacity of the smallest disk |
RAID 5
RAID 5 is a RAID configuration that achieves redundancy through data distribution and parity. It stripes data across all disks, while distributing parity information within each stripe. The parity information is used to rebuild data in the event of a single disk failure, ensuring data integrity and availability.
| Feature | Description |
|---|---|
| Advantages | High storage utilization, good read performance, and relatively low cost. |
| Disadvantages | Since parity information needs to be updated with each write, the write performance of RAID 5 is slower compared to RAID 0 and other RAID modes without parity. |
| Data Loss Protection | Allows for the failure of 1 disk. |
| Array Migration | Can be migrated to RAID 6. |
| Minimum Disk Count | 3 |
| Disk Capacity | (N - 1) x (Capacity of the smallest disk) |
RAID 6
RAID 6 is a RAID configuration with dual parity, providing higher data redundancy and fault tolerance by adding additional parity information.
| Feature | Description |
|---|---|
| Advantages | Higher fault tolerance and good read performance. |
| Disadvantages | Write performance is worse than RAID 5, and storage utilization is lower. |
| Data Loss Protection | Allows for the failure of 2 disks. |
| Array Migration | Cannot be migrated. |
| Minimum Disk Count | 4 |
| Disk Capacity | (N - 2) x (Capacity of the smallest disk) |
RAID 10
RAID 10 is a hybrid RAID type that combines the advantages of RAID 1 and RAID 0. It first provides redundancy through mirroring (RAID 1), then boosts performance through striping (RAID 0).
| Feature | Description |
|---|---|
| Advantages | High data security. Excellent read/write performance because parity information is not calculated, and write performance is better than RAID 5 and RAID 6. |
| Disadvantages | Low storage utilization, high cost. |
| Data Loss Protection | Data remains available if one disk in any mirrored pair fails. |
| Array Migration | Cannot be migrated. |
| Minimum Disk Count | 4 (total number of disks must be even) |
| Disk Capacity | (N / 2) x (Capacity of the smallest disk) |
- To ensure the stability of the storage pool and data security, avoid mixing USB external disks with local disks in the same storage pool.
- Once an SSD is added to the storage pool, it cannot be reconfigured for SSD caching in the future.
- It is recommended to use disks from the TNAS product compatibility list, as using unsupported disks may affect system stability and lead to data loss.
- All existing data on the disks used to create a storage pool will be deleted. Ensure that these disks do not contain important data before proceeding.