VMs
The VMs application is a virtual machine hypervisor built by TerraMaster based on the KVM kernel. Through an intuitive and easy-to-use centralized management interface, it integrates various virtualization solutions. It enables rapid deployment of virtual machines, flexible allocation of computing resources, and provides enterprise-grade data protection features, offering solid guarantees for business continuity.
Note: VMs and VirtualBox conflict and cannot run simultaneously. An existing installation of VirtualBox will prevent VMs from being enabled.
Requirements and Limitations
Supported TOS Versions: TOS 7.0 (x86)
Hardware and File System:
- Memory: 4GB or more is recommended. Running multiple virtual machines requires more memory.
- Storage Space: Only storage spaces under the Btrfs file system are supported as storage locations for virtual machines.
Overview
Tightly arranged data charts provide an intuitive view of the overall operational status of the KVM application, including overview information on virtual machines, storage spaces, and network resources, helping you quickly grasp the health status of the virtualization platform.
Section Description
- Virtualization Environment Status: The top card visually reflects the operational status of the entire VMs virtualization environment using graphical language, alerting you when errors occur on the host, virtual machines, or storage space.
The following statuses may appear in this field:
- Normal: The overall status is good and functioning normally.
- Warning: The status of a virtual machine or storage space is abnormal, but services can still operate normally. It is recommended to check the abnormal resources and troubleshoot.
- Error: The virtual machine or storage space cannot function properly. Please check the status of the abnormal resource and perform maintenance immediately to resolve the issue.
- Virtual Machine Monitoring: Real-time display of CPU usage, memory usage, and resource consumption of key applications inside each running virtual machine.
- Resource Statistics: Displays the total capacity, used capacity, and usage rate of the storage space.
Virtual Machines
Through the "Virtual Machines" module, you can perform complete lifecycle management of virtual machines from creation to deletion.
Virtual Machine List
Displays all created virtual machines (including running and powered-off states) in a list. Click the drop-down button on the right of each virtual machine to expand and view its detailed configuration and performance data.
Data includes:
- General Information: Status, video card, storage, number of CPU cores, memory capacity, firmware (Legacy BIOS/UEFI), CPU compatibility mode, keyboard layout, etc.
- Performance Monitoring: Host CPU usage, host memory usage, total hard disk throughput, total sent/received network packets.
- Other Information: Number of snapshots, auto-start, USB devices, guest agent status, IP address, description.
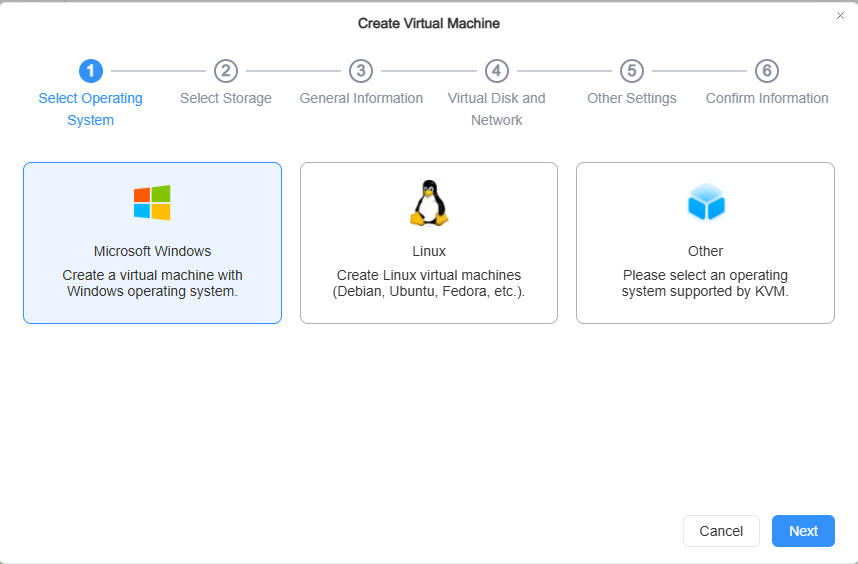
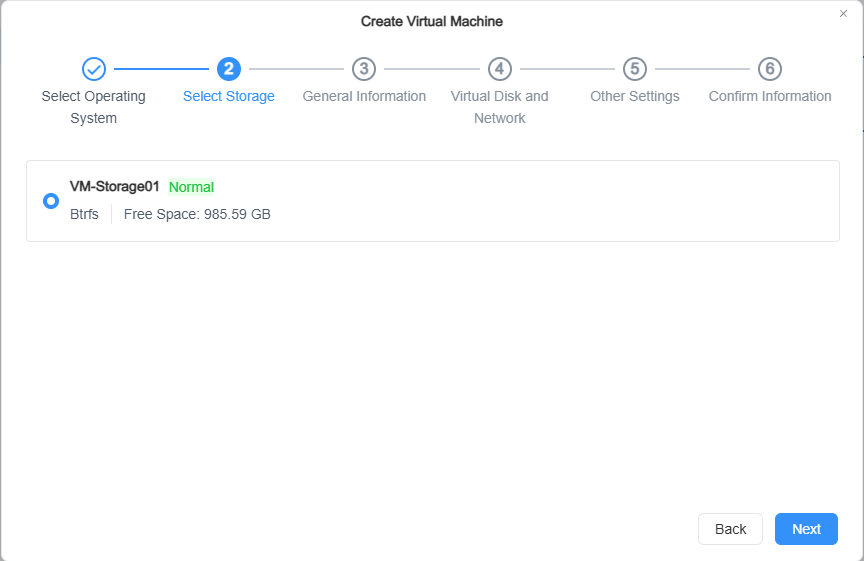
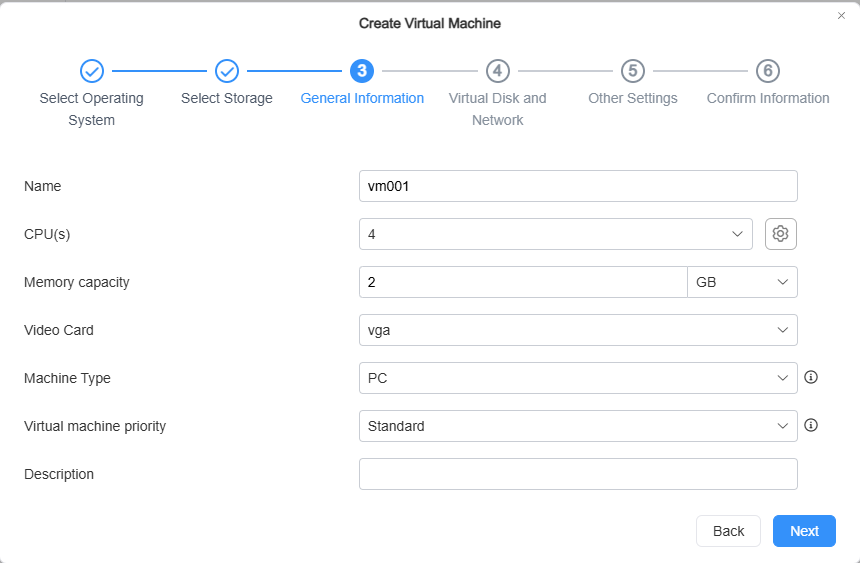
Create Virtual Machine
Follow the wizard steps to configure the parameters of the desired virtual machine.
- Select Operating System: Select the type of operating system to install, such as Microsoft Windows, Linux, or other KVM-compatible systems.
- Set Storage Space: Select a Btrfs storage space that has been added to KVM to store all data of the virtual machine.
- Note: When the selected storage space runs out, the virtual machine will be shut down.
-
General Virtual Machine Settings:
- Name: Specify a unique name for the virtual machine.
- CPU: Define the number of CPU cores for the virtual machine.
Note- CPU Advanced Options:
- Enable CPU Compatibility Mode: Allows live migration between two hosts with different CPU models.
- Enable Hyper-V Enlightenments: Can improve the performance of Windows virtual machines.
- QoS Settings
- Reserve CPU threads: Can reserve CPU threads for virtual machines that require higher performance. Reserved CPU threads cannot be used for other services or virtual machines.
- Virtual Machine Priority: Set the relative weight of the virtual machine when resource contention occurs (Low, Below Normal, Standard, Above Normal, High).
- Memory: Define the amount of memory allocated to the virtual machine. Upon startup, this portion of memory will be reserved.
- Video Card: Select the video card type (Cirrus, VGA, vmvga).
- cirrus: Cirrus Logic GD5446 graphics card. All Windows versions since Windows 95 should recognize and use this card.
- vga: Standard VGA card with Bochs VBE extensions. All Windows versions since Windows XP should recognize this card. It supports higher resolutions.
- vmvga: Compared to vga, vmvga is a more advanced virtual display card.
- Description: Add a description for easy identification of the virtual machine (maximum 64 characters).
-
Configure Virtual Disks and Network:
- Virtual Machine Disk
- General: Configure the size of the virtual disk space. Up to 8 virtual disks can be added.
- Virtual Disk Controller: Select the disk controller type (IDE, SATA, VirtIO SCSI).
- Others: Configure advanced options such as space reclamation and IOPS range.
- Virtual Machine Network
- Network: Add or remove network interfaces for the virtual machine. Click "Settings" to configure the MAC address and network type.
 Note
Note- Virtual disk interfaces support VirtIO, SATA, and IDE. The VirtIO interface provides better performance.
- SATA and IDE interfaces have better compatibility with most operating systems.
- Network interfaces support VirtIO, e1000, and rtl8139 network card models.
- You can also choose to enable SR-IOV, which allows supported network adapters to accelerate network performance while consuming less CPU resources. To enable SR-IOV, both your host and physical network adapter must support SR-IOV.
- When SR-IOV is enabled, you cannot select the network card model.
- When SR-IOV is enabled, live migration of virtual machines between hosts is not supported.
- When SR-IOV is enabled, the virtual machine cannot be suspended.
- Virtual Machine Disk
-
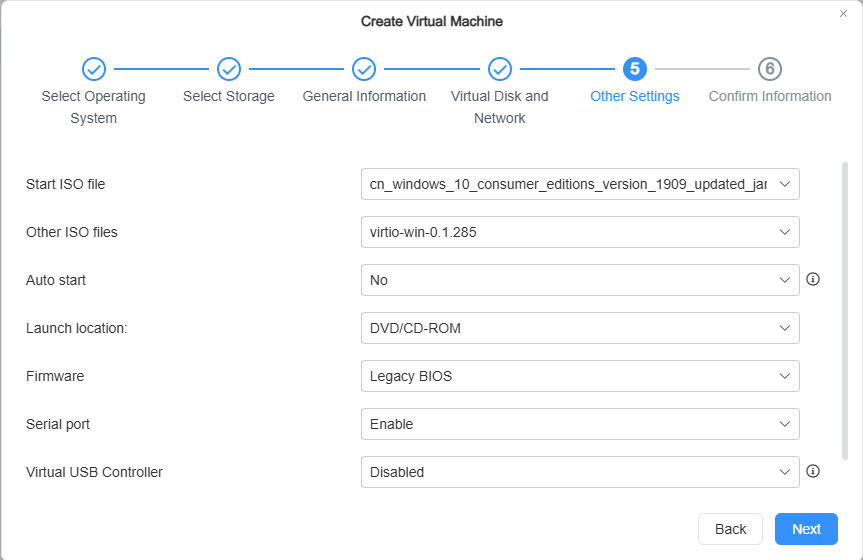
Other Settings:
- Boot ISO File: Select an image file as the boot medium for the virtual machine (e.g., operating system installation disk).
- Other ISO File: Attach an additional ISO file, such as a driver CD.
- Auto Start: Set whether to automatically start this virtual machine when the host starts.
- Firmware: Select the boot firmware (Legacy BIOS or UEFI).
- Virtual USB Controller: Add a USB controller and assign USB devices on the host to the virtual machine for use.
 Note
Note- A USB device cannot be assigned to multiple virtual machines.
- On some older operating systems (e.g., Windows 7), the virtual USB 3.0 controller may require installation of the nec-xhci driver and may have some compatibility issues.
- If a USB device does not exist on the host where the virtual machine is running, the device will be detached.
-
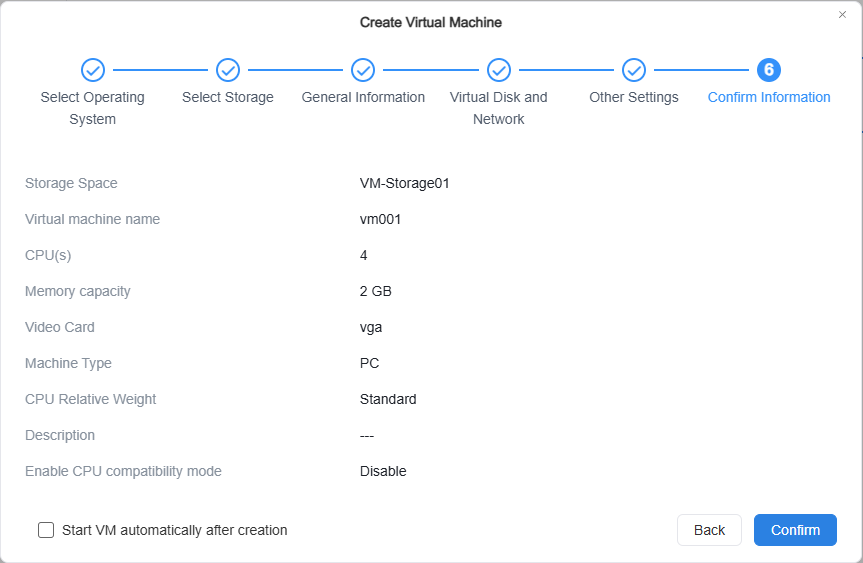
Confirm Settings: Review all configuration information, check "Start virtual machine after creation" (optional), and click Confirm to complete creation.
Manage Virtual Machines
-
Power Management: Select a virtual machine and click the "Power" button to control its state.
- Start: Starts the virtual machine.
- Shut Down: Shuts down the virtual machine normally.
- Force Shut Down: Powers off the virtual machine directly, which may cause data loss.
-
Connect to Virtual Machine: The system will open the selected virtual machine via a VNC web console, where you can operate the virtual machine directly.
-
Edit Virtual Machine: Select a powered-off virtual machine and click "Edit" to modify its hardware specifications and permissions.
-
Delete Virtual Machine: Select a virtual machine and click "Delete" to remove it. This operation will delete both the virtual machine and all its associated virtual disks.
-
More Functions
- Clone: Quickly create a copy based on the current virtual machine.
- Import: Import an OVA file and create a new virtual machine based on its configuration.
- Export: Export the virtual machine as a file and save it to a shared folder. VMware-compatible export mode is available.
- Migrate: Migrate the virtual machine to another host or change its storage location. Live migration is supported for running virtual machines.
- Take Snapshot: Manually create a restore point for the virtual machine (including state, settings, and all disks).
- Snapshot List: View and manage all snapshots, and restore or clone from any snapshot.
- Create Sharing Link: Generate a sharing link for the virtual machine with an expiration date and password.
- Sharing Link Manager: View, edit, or delete all created sharing links.
- It is recommended to install the QEMU Guest Agent. After installation, shutdown and restart commands will be passed to the operating system to ensure successful execution.
- When the virtual machine is running, core configurations such as CPU, memory, video card, network adapter, virtual hard disk order/interface, and USB controller cannot be modified. Only hot-adding of VirtIO virtual hard disks is supported.
- During import, the disk size and order in the OVA or disk image cannot be modified.
- When importing an OVA file, the system will automatically apply the configuration based on the file.
- When importing a virtual disk image into a virtual machine, if the image is not in the specified storage location, the system will download it from another location and save it to the current location.
Storage Space
You can add and manage storage spaces for virtual machines. All virtual hard disks use thin provisioning, only occupying physical space when data is written.
Storage Space List
Displays the status and usage of all added storage spaces in a list.
- General Information: Storage space name, status, used/total storage, usage.
- Detailed Information: Host, total capacity, available space, space allocated to virtual hard disks.
- Virtual Machine Usage: Displays, in a list, all virtual machines and their disk usage details that use virtual disks on this storage space.
Manage Storage Space
- Create Storage Space: Select a storage space with the Btrfs file system from the host's available volumes.
- Edit Storage Space: Rename an added storage space.
- Delete Storage Space: Remove the selected storage space from the KVM application.
- You can only select Btrfs storage spaces as virtual machine storage spaces.
- When there is a running virtual machine in the storage space, that storage space cannot be deleted.
Network
You can create and manage virtual networks for virtual machines, enabling communication between virtual machines and between virtual machines and external networks.
Network List
Displays all configured virtual networks in a list.
- General Information: Network name, status, network type (Private, External).
- Association Information: Number of hosts using the physical interface, network interface, VLAN ID, list of virtual machines using this network.
Manage Network
- Add Network: Set the network name, network type (Bridge/NAT/Host-Only), and VLAN ID (optional), and from all hosts, select the physical network interfaces to be used for constructing this virtual network.
- Edit Network: Change the virtual network's name, VLAN ID, or associated physical network interfaces.
- Delete Network: Delete the selected virtual network.
- If some network interfaces of the virtual switch are not working properly, the virtual switch status will become warning, but the virtual machine's network connection will still be available.
- If all network interfaces of the virtual switch are not working properly, the virtual switch status will become error. Please check the network device and confirm the network connection of the environment.
- An external virtual switch must include at least one network interface.
- If you delete a virtual switch, all virtual interfaces in that switch will be disconnected. To reassign a virtual switch to a virtual interface, go to VMs > Virtual Machine > Edit.
Images
The Images module is used to manage operating system installation disks (.iso) and virtual hard disk image files (.vmdk, .qcow2, etc.) required for creating virtual machines.
Image List
Displays all added image files in a list.
- General Information: Image name, status (Enabled/Disabled), file type, file size.
- Other Information: Image version, storage location.
Add Image
- Select Import Method: Choose to import from "Local NAS file" or "Local computer file".
- Select File: In the opened window, select the desired image file. Supported formats: .iso, .vmdk, .vdi, .vhd, .vhdx, .img, .qcow2.
- Select Storage Space: Select the storage space to store this image file.
- Note: If uploading manually from a computer, do not close or refresh the browser during the upload process.
- Supported formats:
- ISO files: *.iso.
- Hard disk images: *.vmdk, *.vdi, *.vhd, *.vhdx, *.img, *.qcow2.
- If manually uploading installation files from a computer, do not close or refresh the browser during the upload process to avoid interrupting the upload.
Image Management
- Edit Image: Modify the storage location of the image file.
- Delete Image: Delete the selected image file from the application.
Logs
Lists all operation records executed in the VMs application, allowing log export and management.
Manage Logs
On the Logs page, you can view logs of all tasks, or select specific tasks to view logs. You can also perform the following settings for logs:
- Search: Search for events;
- Refresh: Refresh the logs;
- Export: Export logs;
- Delete: Delete logs – can delete all logs or specific logs;
- Settings: Set log retention policy; logs that do not comply with the policy will be automatically deleted.