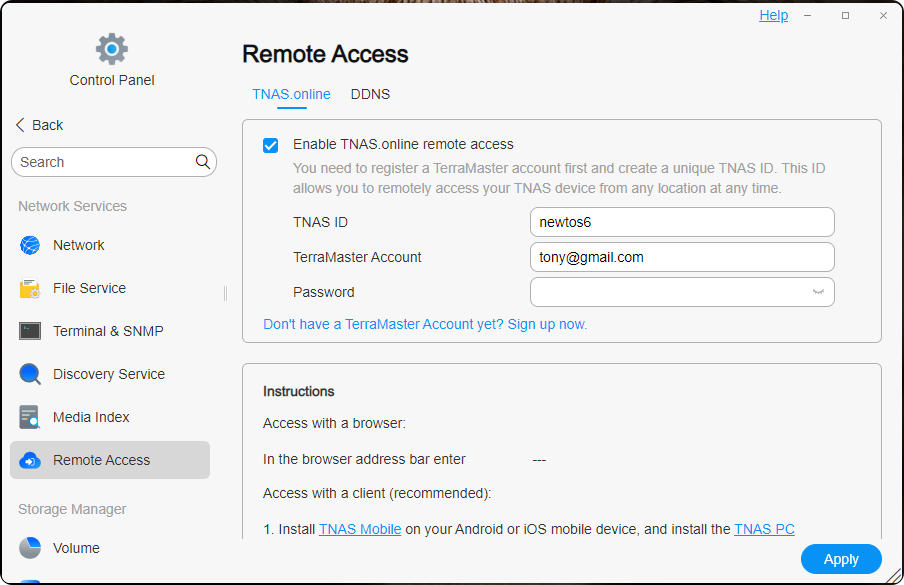
Remote Access
TNAS.online
TNAS.online is a remote access tool specifically designed for TNAS devices, allowing users to connect to their TNAS via the internet without the need for port forwarding. TNAS.online can be used in conjunction with other TOS applications (TNAS PC) and mobile device applications (TNAS Mobile).
Setting up TNAS.online

- Go to TOS Desktop > Control Panel > Remote Access > TNAS.online.
- Check "Enable TNAS.online remote access".
- Enter your "TNAS ID" and remember it. TNAS ID is a unique ID bound to your TNAS device. If the entered ID is already in use, try another.
- Enter your TerraMaster account credentials.
- Click "Apply".
- When the status displays "Remote access enabled!", TNAS.online remote access has been successfully activated. Now, you can easily access your TNAS device anytime, anywhere.
- Before enabling TNAS.online remote access, you need to register a TerraMaster account. This account is primarily used for managing your devices, remote access, and enjoying future value-added services.
- Before using TNAS.online to remotely access TNAS devices, you must be a TNAS user. If you are not yet a TNAS user, please contact your TNAS administrator. All TNAS users have TNAS.online remote access permissions.
Remote Access Using TNAS.online
Before starting to use TNAS.online to remotely access your TNAS device, ensure that you have enabled this feature in the TOS system.
Method 1: Access via Browser
- Enter the following in the browser address bar: TNAS.online/TNAS ID
- For example, if your TNAS ID is "Jack2010", enter "TNAS.online/Jack2010" in the browser address bar to access your device.
Method 2: Access via Client Applications (Recommended)
- Install TNAS mobile on your Android or iOS mobile device, and TNAS PC application on your computer.
- Click "+", enter TNAS ID, TNAS username, and password, then click "Confirm".
- Once the client application logs in successfully, you will be able to access the device in your browser using TNAS's virtual IP address. The access address format is: [protocol]://[TNAS virtual IP]:[port number]. For example: https://100.88.0.1:5443
TerraMaster provides free downloads of the TNAS PC application from their official website. TNAS mobile applications are available for free on the Apple App Store and major mobile app markets.
DDNS
DDNS (Dynamic Domain Name System) is a convenient method for accessing TNAS devices remotely. It allows mapping your TNAS device to a fixed domain name so that even if your device's IP address changes, you can still access the device remotely by simply using this dynamic domain name.
Setting up DDNS
Select "Use existing service provider", fill in the form with the information obtained during DDNS service registration, and click the "Apply" button to save.
- Before enabling DDNS service, select one of the domain service providers from the menu list and proceed to register a domain on their official website.
- Record the information submitted during domain registration and enter it into the DDNS setup form.
- Prior to accessing TNAS using DDNS, you need to set up port forwarding on your router.
- When the TNAS settings menu displays "connected", it indicates that the DDNS setup was successful.
If the existing service providers do not meet your needs, you can manually add a new service provider yourself.
- Depending on your country or region, there may be cases where certain domain service providers cannot be used.
- When manually adding a DDNS service provider, follow this format for the URL:
If your username is "test," password is "123456," domain is "test.com," and IP address is "111.11.111.111," the URL should be filled out as follows:
http://test:123456@dynupdate.no-ip.com/nic/update?hostname=test.com&myip=111.11.111.111
Remote Access Using DDNS
- Enter the domain name provided by your DDNS service provider along with the port number into the address bar of your computer's browser.
- Enter your TNAS username and password, then click "Login".